I started with the ambitious idea of wanting Circuit Python to work on the Radiona ULX3S . Easily said...
Really short TL;DR this ended up being mostly a blog about the (mysteries and difficulties of installing) toolchain. See this to get started .
TL;DR; Circuit Python is a "C" app that needs a CPU to run on. The Feather M0 is an ARM processor option known to work well with Circuit Python. We'll need to configure the ECP5 FPGA to be a soft CPU on the ULX3S, as Circuit Python no longer supports the current ESP32 as of version 4, but the ESP32-S2 will be supported. Fomu is an FPGA that's had some work towards Circuit Python. There are multiple Fomu versions. Need to first install foboot. Then the rxrbln fork of Claire Wolf's RISC-V toolchain for the ULX3S ECP5. Note make -j$(nproc) build-tools installs all 4 toolchains, when we probably only want riscv32i. There's an open Adafruit issue regarding Fomu port of CircuitPython #2604. Be careful using a hub. Install FPGA toolchain; see this gist and this repo. Note that 4GB is now the minimum RAM to build prjtrellis, 5GB to build nextpnr-ecp5 , and at least 30GB disk.
First, I'd like to extend my thanks to Tim "mithro" Ansell for giving me a pair of Hacker Fomu's at Hackaday 2019. I'm so glad I had a chance to meet him. What an awesome guy!
Many of my notes here are quite similar to my previous, multi-part post on setting up a RISC-V on the tinyFPGA-BX. See also Luke's picosoc example code here .
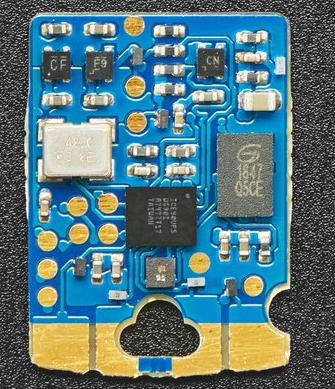
There are multiple FOMU versions. My FOMU that I received from Tim looks like this and is the hacker version, using the bash command
export FOMU_REV=hacker
:
The Adafruit FOMU (#4332) is the production version:
I started following along the timvideos getting started but didn't have a lot of success.
The tutorial references and links to foboot 1.8.1 (evt-installable.dfu) I eventually noticed in the list of releases and a note that the Hacker version did not have support until Version 1.8.8 . Of course it didn't. No fun if it's too easy. :)
I also ordered an even more robust, known-good CircuitPython board, the Adafruit Feather M0 Express. This started me down yet another rabbit hole (specifically this ) as the fomu didn't play well when sharing a USB hub.
Also - in my case, for some reason the Ubuntu VM no longer had an IP address after rebooting the host. Apparently others have had the same problem. Indeed I needed to add this to my
/etc/network/interfaces after confirming ens33 was the name of my network adapter with the ip address
command. Nothing is ever as easy as it is supposed to be. The fun never stops! ;)
# The primary network interface
auto ens33
iface ens33 inet dhcp
confirm that ens33 is the proper device.
Update: it seems that Ubuntu only "forgets" the IP address assignment if the VM is paused. During reboots or initial install - the network interface works properly with no edits to the interface file.
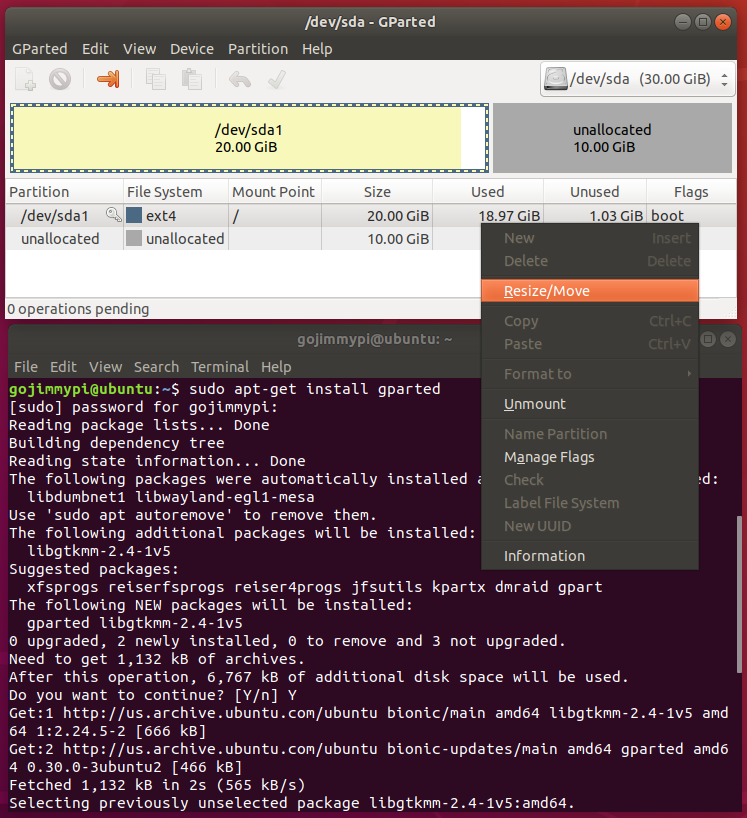
Oh - and more that the default 20GB disk space is needed (40GB is safe, but perhaps as little as 35GB) if doing this in a VM. Ubuntu does not automatically recognize a bigger disk after it has been expanded, so gparted needs to be installed as explained on stackexchange . Simply right-click and select "Resize/Move". Be sure to click on the little green check mark to apply changes.
cd ~
# does dfu-util work?
dfu-util -l
# if "Cannot open DFU device 1209:5bf0" try sudo
sudo dfu-util -l
# can't find dfu-util with sudo?
whereis dfu-util
# here we go
sudo /home/gojimmypi/ecp5-toolchain-linux_x86_64-v1.6.2/bin/dfu-util -l
# upgrade foumu
cd workspace
mkdir fomu
cd fomu
wget https://github.com/im-tomu/foboot/raw/master/releases/v1.8.1/evt-installable.dfu
sudo /home/gojimmypi/ecp5-toolchain-linux_x86_64-v1.6.2/bin/dfu-util -D evt-installable.dfu
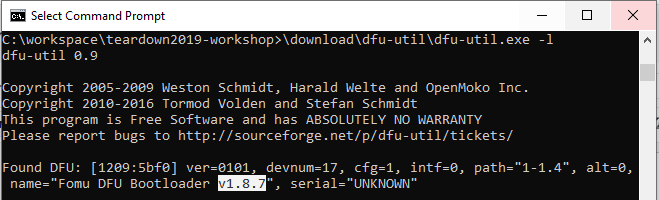
If successful, should give output like this:
dfu-util 0.9
Copyright 2005-2009 Weston Schmidt, Harald Welte and OpenMoko Inc.
Copyright 2010-2019 Tormod Volden and Stefan Schmidt
This program is Free Software and has ABSOLUTELY NO WARRANTY
Please report bugs to http://sourceforge.net/p/dfu-util/tickets/
Match vendor ID from file: 1209
Match product ID from file: 5bf0
Opening DFU capable USB device...
ID 1209:5bf0
Run-time device DFU version 0101
Claiming USB DFU Interface...
Setting Alternate Setting #0 ...
Determining device status: state = dfuIDLE, status = 0
dfuIDLE, continuing
DFU mode device DFU version 0101
Device returned transfer size 1024
Copying data from PC to DFU device
Download [=========================] 100%       106814 bytes
Download done.
state(7) = dfuMANIFEST, status(0) = No error condition is present
state(8) = dfuMANIFEST-WAIT-RESET, status(0) = No error condition is present
Done!
To more gracefully setup permissions see the fomu docs . Basically:
# add this line to /etc/udev/rules.d/99-fomu.rules
SUBSYSTEM=="usb", ATTRS{idVendor}=="1209", ATTRS{idProduct}=="5bf0", MODE="0664", GROUP="plugdev"
And then:
sudo groupadd plugdev
sudo usermod -a -G plugdev $USER
id $USER
sudo udevadm control --reload-rules
sudo udevadm trigger
# logoff then back on
Next, we want to have the rxrbln ULX3S version of PicoRV32 :
# on a completely new system:
THISRISCV=riscv32i
THIS_RISCV_PATH=/opt/$THISRISCV/bin
MIN_ULX3S_MEMORY=5050000
if [ $(free | grep Mem | awk '{ print $2 }') -lt $MIN_ULX3S_MEMORY ]; then
  echo ""
  echo "System memory found:"
  free
  echo ""
  read -p "Warning, at least $MIN_ULX3S_MEMORY bytes of memory is needed. Press$
fi
sudo apt-get update --assume-yes
sudo apt-get upgrade --assume-yes
sudo apt-get install git --assume-yes
cd ~
mkdir -p ~/workspace
cd workspace
git clone https://github.com/rxrbln/picorv32.git
cd picorv32
sudo apt-get install make        --assume-yes
sudo apt-get install make-guile  --assume-yes
sudo apt-get install libgmp3-dev --assume-yes
sudo apt-get install libmpfr-dev --assume-yes
sudo apt-get install libmpc-dev  --assume-yes
sudo apt-get install autoconf automake autotools-dev curl libmpc-dev \
        libmpfr-dev libgmp-dev gawk build-essential bison flex texinfo \
    gperf libtool patchutils bc zlib1g-dev git libexpat1-dev --assume-yes
make download-tools
# install *all four* riscv flavor toolchains:
# make -j$(nproc) build-tools
# or install only riscv32i:
sudo mkdir /opt/riscv32i
sudo chown $USER /opt/riscv32i
git clone https://github.com/riscv/riscv-gnu-toolchain riscv-gnu-toolchain-rv32i
cd riscv-gnu-toolchain-rv32i
git checkout 411d134
# if you see fatal: clone of 'git://  ...
# users sitting behind a firewall may need these:
git config --global url.https://github.com/.insteadOf git://github.com/
git config --global url.https://git.qemu.org/git/.insteadOf git://git.qemu-project.org/
git config --global url.https://anongit.freedesktop.org/git/.insteadOf git://anongit.freedesktop.org/
git config --global url.https://github.com/riscv.insteadOf git://github.com/riscv
# this next statement takes a long time. be patient:
git submodule update --init --recursive
mkdir build; cd build
../configure --with-arch=rv32i --prefix=/opt/riscv32i
make -j$(nproc)
# see if it is working:
/opt/riscv32i/bin/riscv32-unknown-elf-gcc --version
# add to path
if [ "$(cat ~/.bashrc | grep  $THIS_RISCV_PATH)" == "" ]; then
  echo PATH=$PATH:$THIS_RISCV_PATH >> ~/.bashrc
  echo "~/.bashrc updated with this line:"
  echo PATH=$PATH:$THIS_RISCV_PATH
else
  echo "Found $THIS_RISCV_PATH in ~/.bashrc - path not changed."
fi
if [ "$(echo $PATH | grep  $THIS_RISCV_PATH)" == "" ]; then
  export PATH=$PATH:$THIS_RISCV_PATH
  echo "Updated current path: $PATH"
else
  echo "Path not updated. PATH=$PATH"
fi
cd ~/workspace
git clone https://gist.github.com/gojimmypi/f96cd86b2b8595b4cf3be4baf493c5a7 ulx3s_fpga_toolchain
cd ulx3s_fpga_toolchain
chmod +x ULX3S_WSL_Toolchain.sh
./ULX3S_WSL_Toolchain.sh
Run scripts with the source command if you don't want to start a new shell, or manually set path. You may wish to put this line at the end of your
~/.bashrc
file:
#add path to riscv32i compiler
PATH=/opt/riscv32i/bin:$PATH
Once the RISC-V toolchain is installed, there's some sample code in the picosoc directory. Fortunately rxrbln has already made some modifications in the Makefile for the ULX3S. The C code is compiled with:
make ulx3s_fw.img
To upload the code to the ULX3S:
make ulx3sprog
Note from the Makefile there are 2 key steps: #1 to put the ulx3s.bit soft CPU onto the FPGA, then #2 put the firmware into FLASH memory:
/usr/src/f32c-ujprog/ujprog/ujprog -j FLASH -f 0x200000 ulx3s_fw.img
/usr/src/f32c-ujprog/ujprog/ujprog -t ulx3s.bit # -j FLASH
The default install directory for ujprog is
/usr/local/bin/ujprog however the rxrbln Makefile expects it to be
/usr/src/f32c-ujprog/ujprog/ujprogso we'll just create a quick symlink
sudo mkdir -p /usr/src/f32c-ujprog/ujprog/
sudo ln -s /usr/local/bin/ujprog /usr/src/f32c-ujprog/ujprog/ujprog
yosys/nextpnr/ https://gist.github.com/gojimmypi/243fc3a6eead72ae3db8fd32f2567c96In the end, I put together a full ULX3S toolchain installer . Next blog I go into details of actually getting the soft CPU and RISC-V code onto the ULX3S.
Other stuff:
TODO - do we really want a 2+ year old RV32I toolchain ? (note git checkout 411d134)
* https://workshop.fomu.im/en/latest/
See also:
A cobbled-together profiler for CircuitPython .
Copyright (c) gojimmypi all rights reserved. Blogger Image Move Cleaned: 5/3/2021 1:35:54 PM