Connecting ethernet wired-only equipment to WiFi.
TL;DR install
dnsmasq, edit /etc/dnsmasq.conf to setup DHCP server and /etc/dhcpcd.conf to configure eth0, enable forwarding then manually set default routes.
There are lots of articles on using a Raspberry Pi as a WiFi AP (Access Point, aka "hotspot") and routing that traffic onto a wired eth0 connection: wlan0 to eth0. I want the opposite: take a Raspberry Pi STA (Station aka "client", already connected to some other WiFi) and route the local eth0 traffic into the wireless wlan0. Ideally, I'd like that eth0 to be bridged onto the WiFi network (DHCP relay onto eth0). Turns out that's not so easy. Google "can't add wlan0 to bridge br0: Operation not supported"
Why do this? Well, I started with my new Envox BB3 programmable power supply that has only a wired ethernet connection. What would it take to connect it via a Raspberry Pi to WiFi? Not as trivial of a matter as I had expected.

To get started, see my prior blog on setting up a headless Raspberry Pi.
This first operational example below uses somewhat of a brute-force method in using dhcpcd to manually configure the eth0 interface, and dnsmasq as a DHCP server.
First, install dnsmasq
sudo apt-get install dnsmasq --assume-yes
Essential to the RPi acting as a forwarding router, edit the
/proc/sys/net/ipv4/ip_forward file and ensure a value of 1 is there. Note that the change is immediate, although perhaps not permanent. Thanks to a comment on stackexchange, I found this to be very helpful:
grep -rn net.ipv4.ip_forward /etc/*
In my case:
/etc/sysctl.conf:28:#net.ipv4.ip_forward=1
Note the line is commented out. To make IP forwarding permanent, edit the
/etc/sysctl.conf file to uncomment the net.ipv4.ip_forward=1 line.
Edit
/etc/dnsmasq.conf and add these lines at the end to serve as a DHCP server on the RPi ethernet port:
#configure the eth0 interface
interface=eth0
# The three modes are "wildcard", "bind-interfaces" and "bind-dynamic".
bind-dynamic
# Never forward plain names (without a dot or domain part)
domain-needed
# Never forward addresses in the non-routed address spaces.
bogus-priv
# Set the NTP time server address to be the same machine as is running dnsmasq
dhcp-option=42,0.0.0.0
# enable the integrated DHCP server, you need to supply the range of
# addresses available for lease and optionally a lease time
dhcp-range=192.168.42.50,192.168.42.59,255.255.255.0,12h
Edit /etc/dhcpcd.conf (see RPi docs and man page) and add these lines to assigned a fixed IP address to the RPi ethernet port:
interface eth0
static ip_address=192.168.42.10/24
# add the default route on the RPi on the line below. See command:
# ip route | grep default
# static routers=192.168.42.10
static routers=192.168.42.10, 192.168.1.10
# Don't solicit or accept IPv6 Router Advertisements and DHCPv6
noipv6
# Don't solicit or accept IPv6 Router Advertisements.
noipv6rs
# ensure this route has a high metric to not use it for regular traffic
metric 900
Reboot the RPi.
Once everything is setup, a tiny bit of attention is needed to get routing working properly. This is because your default router does not "know" that a new network exists and is routed through a specific device interface. We need to know the IP address of the RPi that is now acting as router, shown here using the
ifconfigcommand:
pi@raspberrypi:~$ ifconfig -a wlan0
wlan0: flags=4163<UP,BROADCAST,RUNNING,MULTICAST>  mtu 1500
        inet 192.168.1.110  netmask 255.255.255.0  broadcast 192.168.1.255
My IP address in this case is 192.168.1.110, other WiFi IP addresses will likely be different.
The best way to set the new default route is at the WiFi router itself. Given the many different types of routers, there are as many methods of setting a new route. For dd-wrt, see static routing.
Alternatively, this can be done on a local workstation (in my case the one running EEZ Studio that I want to connect to the BB3); On Windows in an administrative privileges DOS command prompt. connected to the same network WiFi as the RPi configured above, we need to manually tell Windows how to find the new Raspberry Pi routed subnet with the DOS
route command:
ROUTE [-f] [-p] [-4|-6] command [destination] [MASK netmask] [gateway] [METRIC metric] [IF interface]
In our case: route add [destination network] mask 255.255.255.0 [RPi address]:
route add 192.168.42.0 mask 255.255.255.0 192.168.1.110
This basically tells windows: hey, to find the 192.168.42.0 network, route via the address of our Raspberry Pi at 192.168.1.110
To confirm operation:
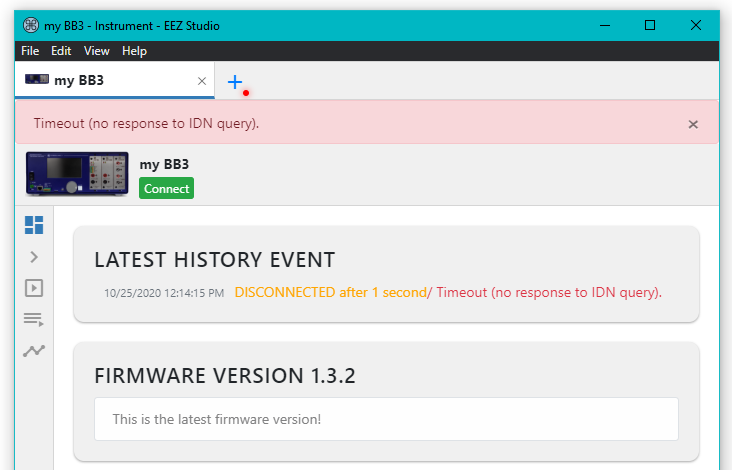
If you see an error "Timeout (no response to IDN query)" in EEZ Studio, try rebooting the BB3
pi@raspberrypi:~$ ifconfig
eth0: flags=4163<UP,BROADCAST,RUNNING,MULTICAST>  mtu 1500
        inet 192.168.42.10  netmask 255.255.255.0  broadcast 192.168.42.255
lo: flags=73<UP,LOOPBACK,RUNNING>  mtu 65536
        inet 127.0.0.1  netmask 255.0.0.0
wlan0: flags=4163<UP,BROADCAST,RUNNING,MULTICAST>  mtu 1500
        inet 192.168.1.110  netmask 255.255.255.0  broadcast 192.168.1.255
pi@raspberrypi:~$ route
Kernel IP routing table
Destination     Gateway         Genmask         Flags Metric Ref    Use Iface
default         192.168.1.10    0.0.0.0         UG    303    0        0 wlan0
192.168.1.0     0.0.0.0         255.255.255.0   U     303    0        0 wlan0
192.168.42.0    0.0.0.0         255.255.255.0   U     900    0        0 eth0
And on Windows with the route print command (edited here, as I have VM's cluttering up the list):
C:\>route print

IPv4 Route Table
===========================================================================
Active Routes:
Network Destination        Netmask          Gateway       Interface  Metric
          0.0.0.0          0.0.0.0     192.168.1.10    192.168.1.140     50
      192.168.1.0    255.255.255.0         On-link     192.168.1.140    306
    192.168.1.140  255.255.255.255         On-link     192.168.1.140    306
    192.168.1.255  255.255.255.255         On-link     192.168.1.140    306
     192.168.42.0    255.255.255.0    192.168.1.110    192.168.1.140     51
  255.255.255.255  255.255.255.255         On-link     192.168.1.140    306
===========================================================================
Persistent Routes:
  None
In the end, although this technically works - it is still not the simple solution I am looking forward. It is too annoying to find DHCP address (or manually configure a static one), and the fuss with manual routes. In my next blog, I test drive wan_kabel. It is pretty cool!
Resources, Inspiration, Credits, and Other Links:
- How to use Raspberry Pi as a Wireless Router with Firewall (RPi AP hotspot)
- Setting up a Raspberry Pi as a bridged wireless access point (also RPi is an AP)
- Using Raspberry Pi as a Wired Router (RPi is STA, routing
eth0)
-
bridging wifi to ethernet on ubuntu not working
-
WiFi (wlan0) to Ethrenet (eth0) bridge help
-
systemd-networkd
-
Creating a bridge for virtual machines using systemd-networkd
-
wiki.debian.org - Bridging Network Connections
-
serverfault.com iptables forwarding between two interfaces
- manpages.debian.org - bridge-utils-interfaces
(sudo apt-get install bridge-utils)
-
wiki.debian.org nftables
-
Howto: Set up a basic nftables firewall (Buster)
-
imp dnsmasq.conf.example
-
osmud dnsmasq FAQ
-
man dhcpcd.conf
-
Changing the metric of an interface permanently
-
Why is my `net.ipv4.ip_forward = 1`?
-
askubuntu How can I set my linux box as a router to forward ip packets?
-
How to make IP forwarding permanent?
Copyright (c) gojimmypi all rights reserved. Blogger Image Move Cleaned: 5/3/2021 1:35:55 PM