Today I discovered how amazingly simply it is to do "Over The Air" (OTA) programming of the ESP8266, thanks to this really cool Random Nerd Tutorial - ESP8266 OTA Updates with Arduino IDE | Over the Air .
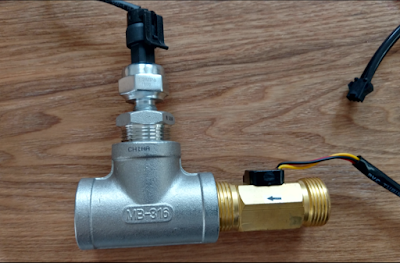
I've been wanting to hook up these pressure and flow sensors that I found on ebay to monitor water usage. I also needed a few fittings that I found on Amazon. I purchased there as I could return them free, no hassle if there was a problem; I had a dreadful time finding anything like this at the local hardware store. I needed this Stainless Steel 316 Cast Pipe Fitting, Hex Bushing, MSS SP-114, 3/4" X 1/4" NPT Male X Female adapter for the pressure sensor, and thisStainless Steel 316 Cast Pipe Fitting, Tee, Class 150, 3/4" NPT Female so that I could hook up both the pressure sensor and flow meter at the same time. The result is a male-female connector that I can slip inline.
You may wonder why I would be interested in something as boring as water pressure. Well, not long ago I discovered my pressure regulator quietly failed. Let's just say I will never again ignore water pressure! There's a reason for the regulator - and the maximum ratings on the water heater. The water softener. The reverse osmosis system.... For only about 10 bucks, you can keep an eye on pressure the manual, old-school way with this Rain Bird P2A Water Pressure Test Gauge - but what fun is that when there's an electronic gizmo option?
I admit I had some temporary disappointment at the beginning of Step 3 of the OTA tutorial, where I expected to see the the esp8266-xxxxxx at my_esp_ip_address port. I did not. I was not able to see this until exiting and restarting Arduino. No worries, onward!
The next step is to program in some other environment other than the Arduino IDE. I am quite addicted to Visual Studio. I have both the VisualGDB and VisualMicro add-ins. I like VisualMicro in that I can take Arduino code samples and immediately start coding. I have yet to figure out how to do this with VisualGDB. The last time I asked about it, there was no hope on the horizon for Arduino support in VisualGDB ,
Initially, it appears there's no option other than the Arduino IDE to actually program OTA. I could find nothing in Visual Studio where it could "see" the pseudo-serial-over-ethernet port. Ha! But fortunately there's a verbose output from the Arduino IDE. In particular this last command shown before uploading:
python.exe C:\Users\gojimmypi\AppData\Local\Arduino15\packages\esp8266\hardware\esp8266\2.3.0/tools/espota.py -i 192.168.1.103 -p 8266 --auth= -f C:\Users\GOJIMM~1\AppData\Local\Temp\arduino_build_690448/sketch_jul15a.ino.bin
The important thing here is that there's a python script called espota.py that sends a binary file to the OTA client. (side note: simply genius implementation in less than 9K!) The paths are crazy long, but the command is essentially this:
python.exe espota.py -i 192.168.1.101 -p 8266 --auth= -f yourfile.bin
Pasting the same OTA sample code into a VisualMicro Ardino Project in Visual Studio... then compiling, shows the output path of the binary:
"C:\Users\gojimmypi\AppData\Local\arduino15\packages\esp8266\tools\esptool\0.4.9/esptool.exe" -eo "C:\Users\gojimmypi\AppData\Local\arduino15\packages\esp8266\hardware\esp8266\2.3.0/bootloaders/eboot/eboot.elf" -bo "C:\Users\gojimmypi\AppData\Local\Temp\VMBuilds\WaterPressureFlow\esp8266_generic\Release/WaterPressureFlow.ino.bin" -bm qio -bf 40 -bz 4M -bs .text -bp 4096 -ec -eo "C:\Users\gojimmypi\AppData\Local\Temp\VMBuilds\WaterPressureFlow\esp8266_generic\Release/WaterPressureFlow.ino.elf" -bs .irom0.text -bs .text -bs .data -bs .rodata -bc -ec
This one is an even longer and crazier command. Really the only thing we are interested in is where the output file is stored. In my case it is:
"C:\Users\gojimmypi\AppData\Local\Temp\VMBuilds\WaterPressureFlow\esp8266_generic\Release/WaterPressureFlow.ino.bin"
There's some sloppy use of mixing forward and back-slashes; for Windows I highly recommend editing them and making them all backslashes.So now using the Arduino OTA command with the destination of the VisualStudio binary, we can develop OTA with Visual Studio! My command looks like this:
python.exe C:\Users\gojimmypi\AppData\Local\Arduino15\packages\esp8266\hardware\esp8266\2.3.0\tools\espota.py -i 192.168.1.103 -p 8266 --auth= -f C:\Users\gojimmypi\AppData\Local\Temp\VMBuilds\WaterPressureFlow\esp8266_generic\Release\WaterPressureFlow.ino.bin
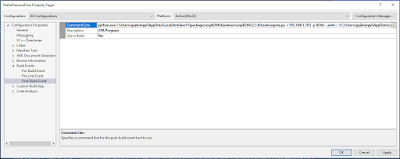
I thought perhaps this could be fully automated by adding the command to the Post Build Event in VisualStudio:
However I was unable to get the command to trigger. This article on Specifying Build Events at Microsoft seems to indicate that last option "In Excluded From Build, specify Yes if you do not want the event to run". However my prompt is "Use in Build". I tried both Yes and No - and the OTA command appears to never have been attempted. Perhaps this is because it is a VisualMicro project. No worries, still just as easy to use the up-arrow in a DOS box to re-upload freshly compiled code.
I'm still hopeful that I will be able to do this in a single build operation. The VisualMicro site has a page indicating that build events are now supported. I've submitted a question to their support forum to find out. It appears the only option is a "quite convoluted and difficult to test" option. Hopefully they have the built-in events working.
And indeed YES! Just minutes after posting my question on the forum, I received a response ! A simple matter of right-click on project - add - Add Local Board.txt with this text
# WaterPressureFlow build property overrides
#
# local project board.txt overrides
network.port=8266
as described here
. So no need for a convoluted solution or manual specification of build event. It just works! Be sure to press "enter" when entering an IP address for serial port (otherwise it won't stick). Now the VisualMicro "Build & Upload" sends OTA data. Sweet. :) See also: https://github.com/gojimmypi/mqttFlowESP8266 and Updating adafruit.io ESP8266 MQTT code
Copyright (c) gojimmypi all rights reserved. Blogger Image Move Cleaned: 5/3/2021 1:35:53 PM


