<?xml version="1.0" encoding="utf-8"?><feed xmlns="http://www.w3.org/2005/Atom" ><generator uri="https://jekyllrb.com/" version="3.10.0">Jekyll</generator><link href="https://gojimmypi.github.io/feed.xml" rel="self" type="application/atom+xml" /><link href="https://gojimmypi.github.io/" rel="alternate" type="text/html" /><updated>2026-10-03T17:38:18+00:00</updated><id>https://gojimmypi.github.io/feed.xml</id><title type="html">Blogs by gojimmypi</title><subtitle>Embedded, FPGA, wolfSSL, ESP32, Arduino, and hardware projects.</subtitle><author><name>gojimmypi</name><email>gojimmypi@gmail.com</email><uri>https://gojimmypi.github.io/about/</uri></author><entry><title type="html">Hackaday Supercon 2026</title><link href="https://gojimmypi.github.io/Hackaday-Supercon-2026/" rel="alternate" type="text/html" title="Hackaday Supercon 2026" /><published>2026-10-03T00:00:00+00:00</published><updated>2026-10-03T00:00:00+00:00</updated><id>https://gojimmypi.github.io/Hackaday-Supercon-2026</id><content type="html" xml:base="https://gojimmypi.github.io/Hackaday-Supercon-2026/"><![CDATA[<p>Stay tuned for notes on Supercon 2026 in Pasadena, CA.</p>

<p>In the meantime, check out the following links for more information on Hazard3 Doom and ULX3S Doom:</p>

<p><a href="https://hazard3-doom.readthedocs.io/">hazard3-doom.readthedocs.io/</a></p>

<p><a href="https://ulx3s.github.io/ulx-doom">ulx3s.github.io/ulx-doom</a></p>]]></content><author><name>gojimmypi</name></author><category term="Hazard3" /><category term="Doom" /><category term="ULX3S" /><category term="ULX4M" /><category term="ESP32" /><category term="Hackaday" /><category term="Supercon" /><summary type="html"><![CDATA[Hackaday Supercon 2026 in Pasadena, CA.]]></summary></entry><entry><title type="html">ULX3S ELECROW 7inch HDMI Enclosure</title><link href="https://gojimmypi.github.io/ulx3s-elecrow-7inch-hdmi-enclosure/" rel="alternate" type="text/html" title="ULX3S ELECROW 7inch HDMI Enclosure" /><published>2026-04-02T00:00:00+00:00</published><updated>2026-04-02T00:00:00+00:00</updated><id>https://gojimmypi.github.io/ulx3s-elecrow-7inch-hdmi-enclosure</id><content type="html" xml:base="https://gojimmypi.github.io/ulx3s-elecrow-7inch-hdmi-enclosure/"><![CDATA[<p>It’s <a href="https://github.com/gojimmypi/ulx3s-elecrow-7inch-hdmi-enclosure">here</a>! The ULX3S Enclosure for the Elecrow 7inch HDMI Display is now available!</p>

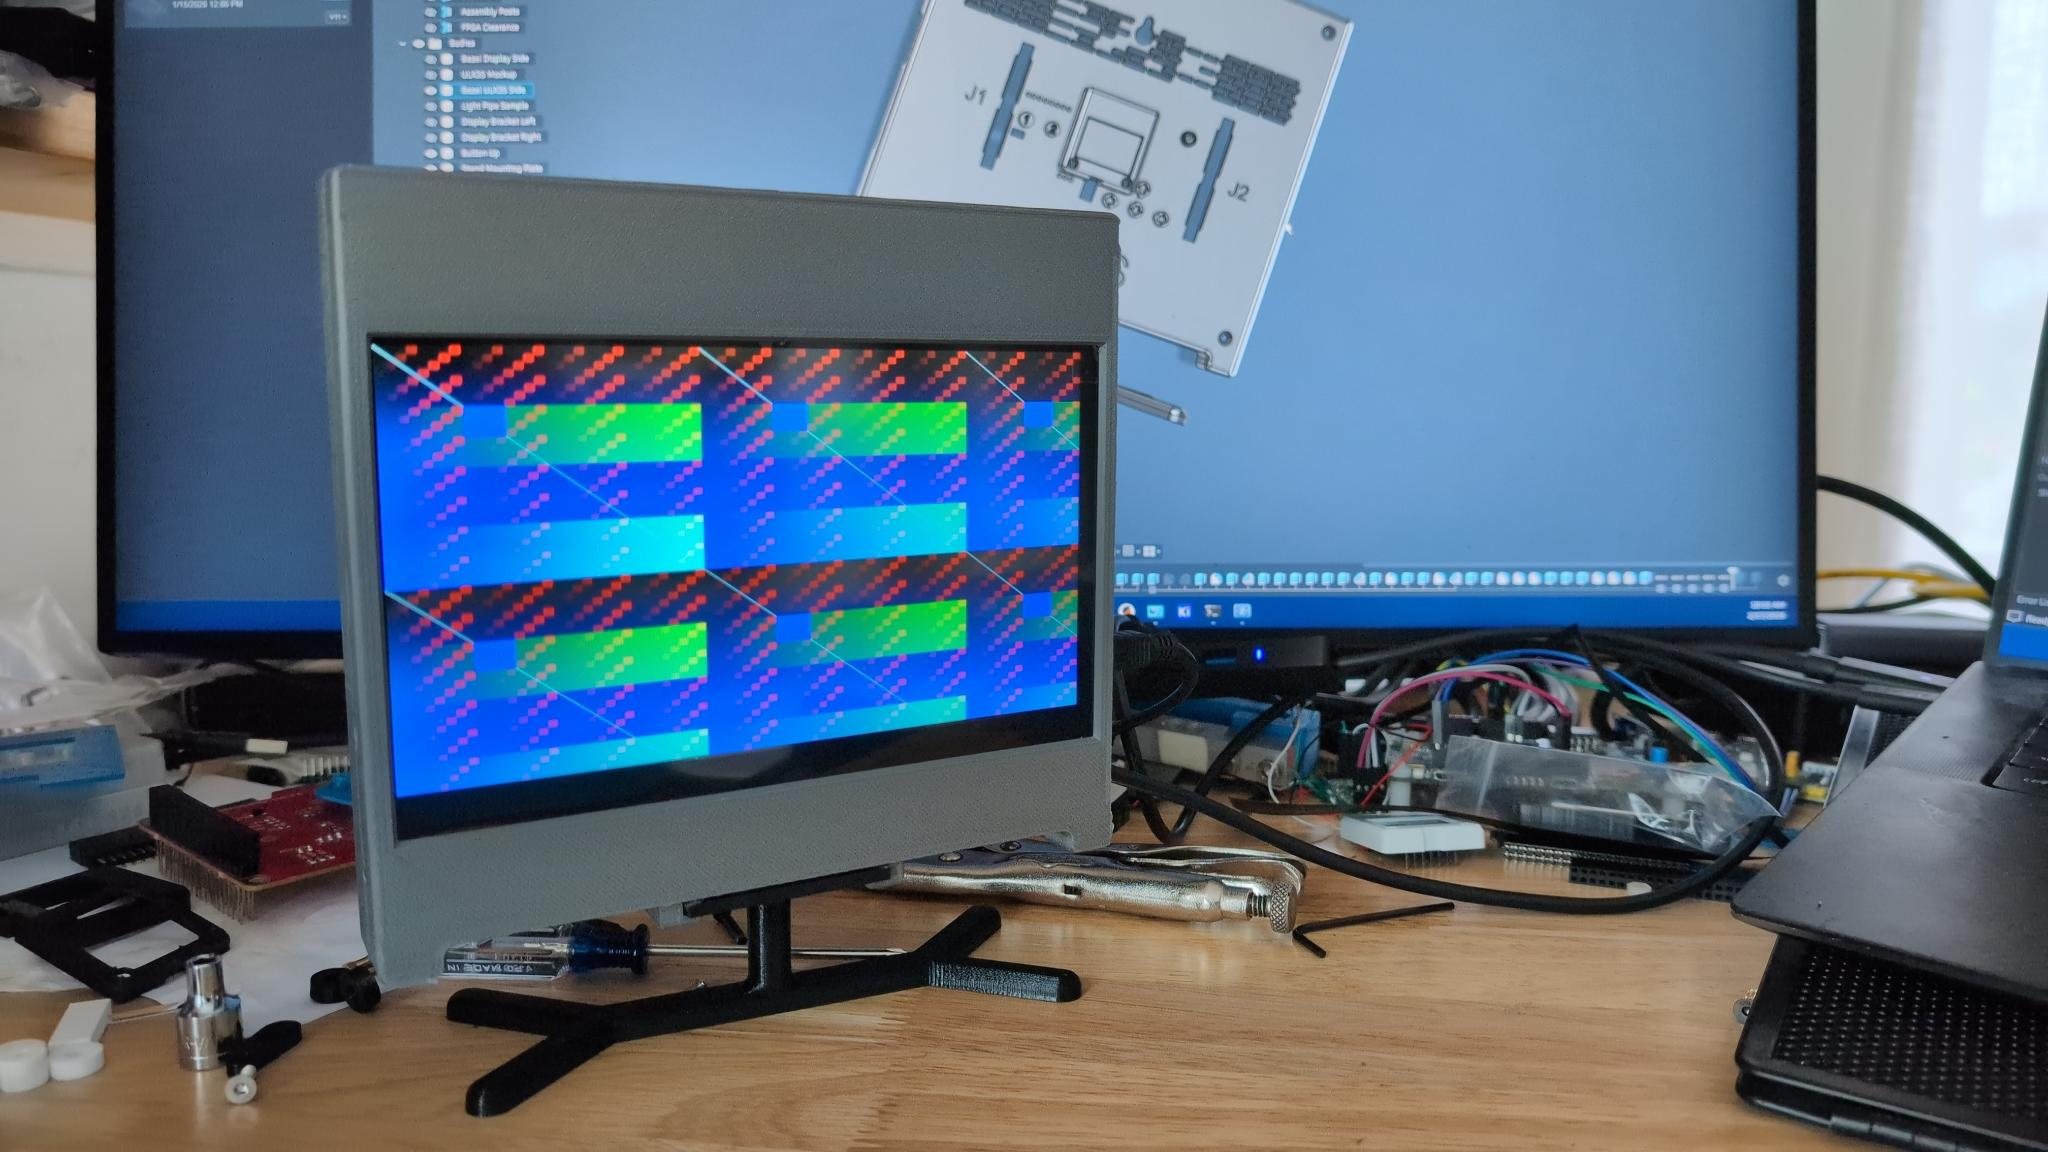
<p><img src="../images/ulx3s/working_prototype_hdmi_enclosure.png" alt="working prototype hdmi enclosure" /></p>

<p>There should be an update at <a href="https://www.crowdsupply.com/radiona/ulx3s/updates">Crowd Supply for the ULX3S</a> in the near future. Preview the <a href="https://github.com/gojimmypi/ulx3s-elecrow-7inch-hdmi-enclosure/blob/main/ANNOUNCEMENT.md">announcement</a>.</p>

<p>The enclosure and all of the related parts are available as open source 3D printable.</p>

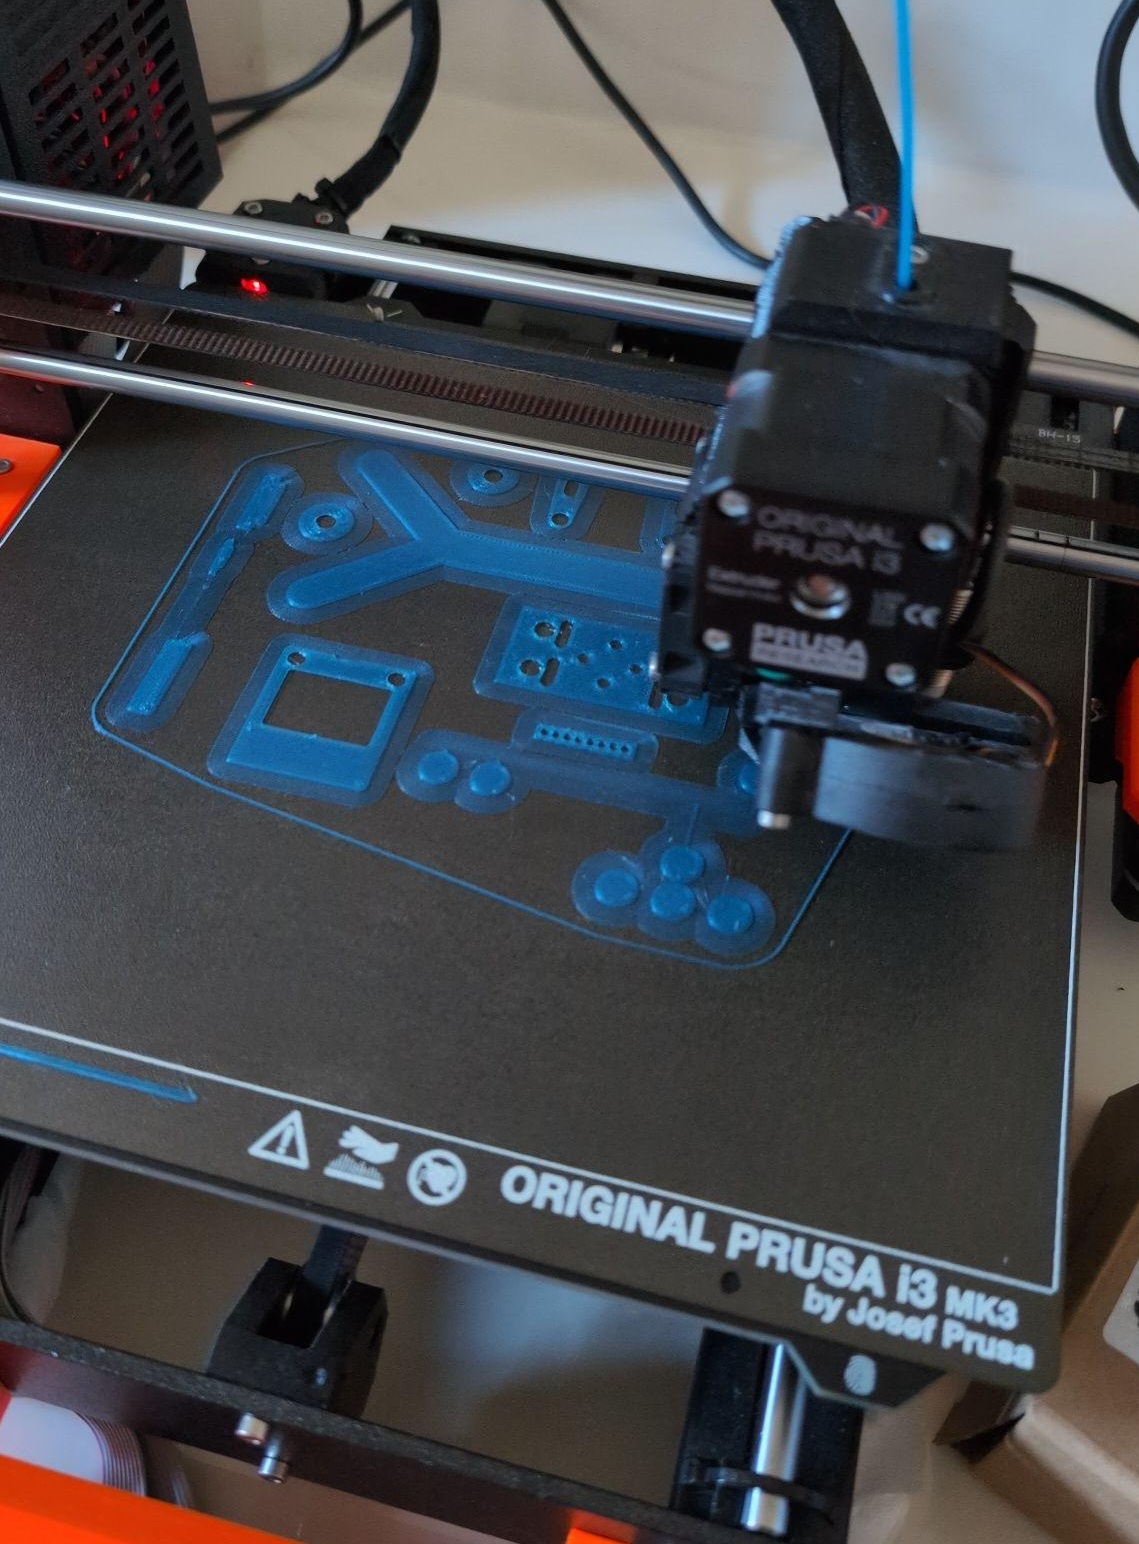
<p><img src="../images/ulx3s/parts_printing_in_progress.jpg" alt="initial parts printing in progress" /></p>

<p>The full <a href="https://github.com/gojimmypi/ulx3s-elecrow-7inch-hdmi-enclosure/ASSEMBLY.md">assembly instructions</a> are available.</p>

<p>If you want an enclosure but don’t have access to a 3D Printer, I may be able to help. Send me a message (at gmail) or <a href="https://www.etsy.com/people/gojimmypi">Etsy</a>.</p>

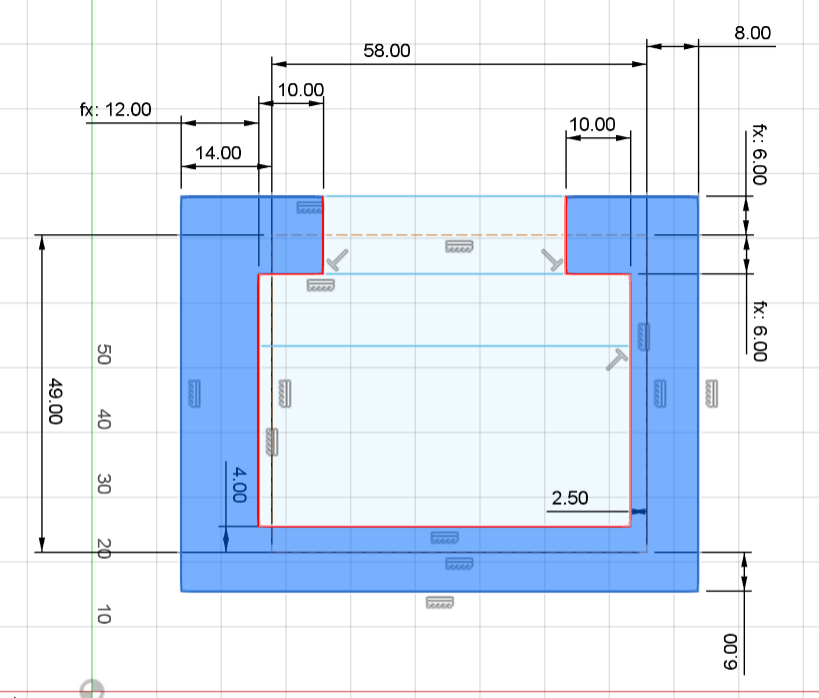
<p>The “enclosure” started out with humble beginnings in <a href="https://x.com/gojimmypi/status/2011592018355798474?s=20">January of 2026</a> as a simple adapter
board. (The Elecrow display was designed for the Raspberry Pi, with different mounting post positions)</p>

<p><img src="../images/ulx3s/initial_adapter.png" alt="initial adapter ketch" /></p>

<p>One thing led to another, and well… now there’s an entire enclosure with many different features and capabilities.</p>

<p>Use the removable stand and enjoy your ULX3S on a desk as shown above.</p>

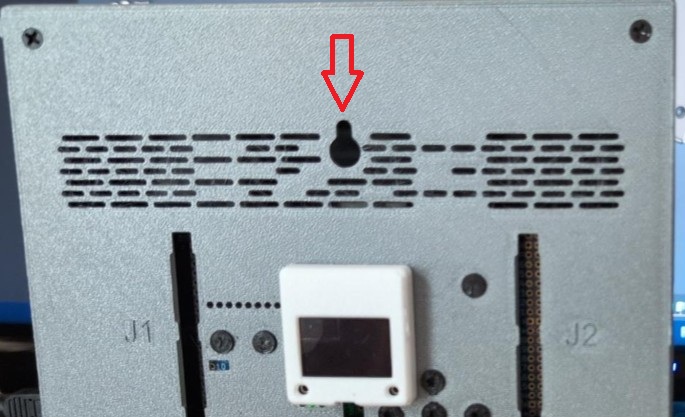
<p>Hang your ULX3S-controlled HDMI display on the wall with a keyhole:</p>

<p><img src="../images/ulx3s/keyhole.jpg" alt="keyhole" /></p>

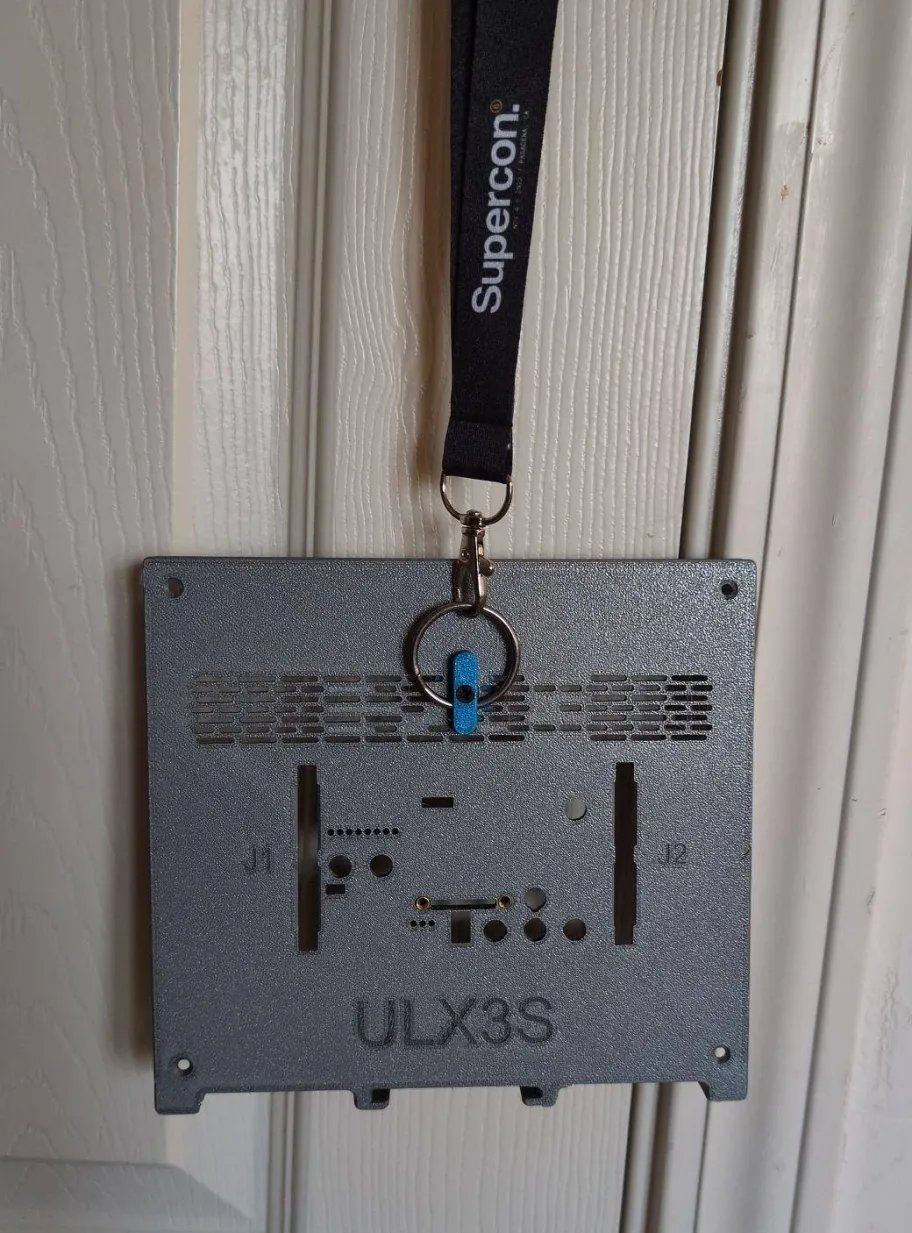
<p>Wear your ULX3S as a badge! There’s an optional keyhole adapter to secure a keyring for a lanyard:</p>

<p><img src="../images/ulx3s/ulx3s_keyhole_adpater_badge.jpg" alt="ulx3s_keyhole_adpater_badge" /></p>

<p>Install any or all of the covers on enclosure holes that are not used.</p>

<p>Connect an external HDMI source to the display. Warning: do not drive display with external source or attempt to use HDMI concurrently with ULX3S connected.</p>

<p>Enjoy sound projects with the internal speakers included with the Elecrow display.</p>

<p>The display and ULX3S board run fairly cool, but there’s a place to install an optional internal fan.</p>

<p>There’s an external audio port from the display as well as a volume control.</p>

<p>The files are all on GitHub:</p>

<p>https://github.com/gojimmypi/ulx3s-elecrow-7inch-hdmi-enclosure</p>]]></content><author><name>gojimmypi</name></author><category term="ULX3S" /><category term="ELECROW" /><category term="7inch" /><category term="HDMI" /><category term="Enclosure" /><category term="3D Printing" /><category term="3DPrint" /><category term="Prusa" /><category term="Display" /><category term="FPGA" /><category term="Radiona" /><summary type="html"><![CDATA[Open Source 3D printing files for ULX3S ELECROW 7inch HDMI Enclosure]]></summary></entry><entry><title type="html">CNC Toolchain notes</title><link href="https://gojimmypi.github.io/CNC-Toolchain/" rel="alternate" type="text/html" title="CNC Toolchain notes" /><published>2026-02-24T00:00:00+00:00</published><updated>2026-02-24T00:00:00+00:00</updated><id>https://gojimmypi.github.io/CNC-Toolchain</id><content type="html" xml:base="https://gojimmypi.github.io/CNC-Toolchain/"><![CDATA[<p><a href="https://github.com/vlachoudis/bCNC">bCNC</a></p>

<blockquote>
  <p>GrblHAL (formerly GRBL) CNC command sender, autoleveler, g-code editor, digitizer, CAM and swiss army knife for all your CNC needs.</p>
</blockquote>

<blockquote>
  <p>An advanced fully featured g-code sender for grblHAL (formerly GRBL). bCNC is a cross platform program (Windows, Linux, Mac) written in python. The sender is robust and fast able to work nicely with old or slow hardware like Raspberry Pi (As it was validated by the GRBL maintainer on heavy testing).</p>
</blockquote>]]></content><author><name>gojimmypi</name></author><category term="CNC" /><category term="GrblHAL" /><category term="GRBL" /><category term="bCNC" /><summary type="html"><![CDATA[Some notes on CNC toolchains]]></summary></entry><entry><title type="html">git gpg for Visual Studio</title><link href="https://gojimmypi.github.io/git-gpg-for-Visual-Studio/" rel="alternate" type="text/html" title="git gpg for Visual Studio" /><published>2026-02-24T00:00:00+00:00</published><updated>2026-02-24T00:00:00+00:00</updated><id>https://gojimmypi.github.io/git-gpg-for-Visual-Studio</id><content type="html" xml:base="https://gojimmypi.github.io/git-gpg-for-Visual-Studio/"><![CDATA[<p>Reminders to self for setting up gpg for Visual Studio.</p>

<div class="language-plaintext highlighter-rouge"><div class="highlight"><pre class="highlight"><code>git config --global --get commit.gpgsign
git config --global --get gpg.program
gpgconf --list-options gpg-agent | findstr /i ttl
</code></pre></div></div>

<p>Ensure there’s a <code class="language-plaintext highlighter-rouge">gpg</code> for <code class="language-plaintext highlighter-rouge">git</code>:</p>

<div class="language-plaintext highlighter-rouge"><div class="highlight"><pre class="highlight"><code>git config --show-origin --get gpg.program
</code></pre></div></div>

<p>Find <code class="language-plaintext highlighter-rouge">gpg</code></p>

<pre><code class="language-dos">where gpg
</code></pre>

<p>Output:</p>

<div class="language-text highlighter-rouge"><div class="highlight"><pre class="highlight"><code>C:\Program Files\Git\usr\bin\gpg.exe
</code></pre></div></div>

<p>Edit or create <code class="language-plaintext highlighter-rouge">%APPDATA%\gnupg\gpg-agent.conf</code>:</p>

<div class="language-plaintext highlighter-rouge"><div class="highlight"><pre class="highlight"><code>mkdir %APPDATA%\gnupg

notepad %APPDATA%\gnupg\gpg-agent.conf
</code></pre></div></div>

<p>Enter timeouts:</p>

<div class="language-plaintext highlighter-rouge"><div class="highlight"><pre class="highlight"><code>default-cache-ttl 3600
max-cache-ttl 7200
</code></pre></div></div>

<p>Restart:</p>

<div class="language-plaintext highlighter-rouge"><div class="highlight"><pre class="highlight"><code>gpgconf --kill gpg-agent
gpgconf --launch gpg-agent
</code></pre></div></div>]]></content><author><name>gojimmypi</name></author><category term="git" /><category term="gpg" /><category term="Visual Studio" /><summary type="html"><![CDATA[Some notes on setting up git gpg for Visual Studio]]></summary></entry><entry><title type="html">IcePi Zero</title><link href="https://gojimmypi.github.io/IcePi-zero/" rel="alternate" type="text/html" title="IcePi Zero" /><published>2026-02-24T00:00:00+00:00</published><updated>2026-02-24T00:00:00+00:00</updated><id>https://gojimmypi.github.io/IcePi-zero</id><content type="html" xml:base="https://gojimmypi.github.io/IcePi-zero/"><![CDATA[<p>Some notes on the IcePi Zero FPGA board.</p>

<p>“A powerful FPGA dev board in a familiar, pint-sized package”</p>

<p>See the funded campaign on Crowd Supply: <a href="https://www.crowdsupply.com/icy-electronics/icepi-zero">Icepi Zero</a></p>

<p>Featured in <a href="https://www.youtube.com/live/7Havv4TaeOE">Exploring Every Way to Build Lattice ECP5 FPGAs</a>.</p>

<p>See also: <a href="https://ofl.trabucayre.com/">openFPGALoader WEB interface at ofl.trabucayre.com</a></p>

<p>https://github.com/trabucayre/openFPGALoader</p>]]></content><author><name>gojimmypi</name></author><category term="FPGA" /><category term="IcePi Zero" /><summary type="html"><![CDATA[IcePi Zero]]></summary></entry><entry><title type="html">Setup Cygwin Xwin X-Windows server for WSL1</title><link href="https://gojimmypi.github.io/Cygwin-with-X-Support-WSL1/" rel="alternate" type="text/html" title="Setup Cygwin Xwin X-Windows server for WSL1" /><published>2025-12-30T00:00:00+00:00</published><updated>2025-12-30T00:00:00+00:00</updated><id>https://gojimmypi.github.io/Cygwin-with-X-Support-WSL1</id><content type="html" xml:base="https://gojimmypi.github.io/Cygwin-with-X-Support-WSL1/"><![CDATA[<p>Here are some notes on installing an X-Windows Cygwin/X (XWin) server for WSL1.</p>

<p>Why would you want Xwin support? Well for one: <a href="https://gtkwave.github.io/gtkwave/">GTKwave</a> from a WSL prompt.</p>

<p>If you choose to use WSL2 (WSLg) instead, the XWindows support is already built in, so stop now.</p>

<p>WSL1 has much better disk performance on shared directories (e.g. <code class="language-plaintext highlighter-rouge">c:\workspace</code> and <code class="language-plaintext highlighter-rouge">/mnt/c/workspace</code>)</p>

<p>This is an update to my prior blog on <a href="../wsl-gui-using-cygwin-x-server-for/">WSL GUI - Using Cygwin X-Server for Graphical Interfac</a></p>

<h2 id="1-install-cygwin-with-x-support-windows-side">1. Install Cygwin with X support (Windows side)</h2>

<p>Download <a href="https://www.cygwin.com/install.html">Cygwin installer</a> and run <code class="language-plaintext highlighter-rouge">setup-x86_64.exe</code>, then explicitly select
these additional items:</p>

<div class="language-text highlighter-rouge"><div class="highlight"><pre class="highlight"><code>xorg-server
xinit
xauth
xterm (recommended)
</code></pre></div></div>

<p>Let Cygwin auto-select dependencies.</p>

<p>Do not manually chase dependencies (GTK, dbus, fonts, etc.).
Cygwin will pull in everything required.</p>

<p>dbus being installed is normal. It does not need to run.</p>

<h2 id="2-start-the-x-server-correctly-for-wsl-1">2. Start the X server correctly for WSL 1</h2>

<p>Important: XWin must listen on TCP and allow local access.</p>

<p>From a Cygwin terminal:</p>

<div class="language-bash highlighter-rouge"><div class="highlight"><pre class="highlight"><code>startxwin <span class="nt">--</span> <span class="nt">-listen</span> tcp <span class="nt">-ac</span>
</code></pre></div></div>

<p>What this does:</p>

<p><code class="language-plaintext highlighter-rouge">-listen tcp</code> : required for WSL 1</p>

<p><code class="language-plaintext highlighter-rouge">-ac</code> : disables X authentication (avoids .Xauthority issues)</p>

<p>Verify:</p>

<p>X icon appears in system tray</p>

<p>An xterm window opens</p>

<h2 id="3-configure-wsl-1-to-use-the-x-server">3. Configure WSL 1 to use the X server</h2>

<p>In WSL:</p>

<div class="language-bash highlighter-rouge"><div class="highlight"><pre class="highlight"><code><span class="nb">export </span><span class="nv">DISPLAY</span><span class="o">=</span>:0
</code></pre></div></div>

<p>(Optional, persistent)</p>

<div class="language-bash highlighter-rouge"><div class="highlight"><pre class="highlight"><code><span class="nb">echo</span> <span class="s1">'export DISPLAY=:0'</span> <span class="o">&gt;&gt;</span> ~/.bashrc
</code></pre></div></div>

<h2 id="4-install-test-x-applications-in-wsl">4. Install test X applications in WSL</h2>

<div class="language-bash highlighter-rouge"><div class="highlight"><pre class="highlight"><code><span class="nb">sudo </span>apt update
<span class="nb">sudo </span>apt <span class="nb">install </span>x11-apps
</code></pre></div></div>

<p>Test:</p>

<div class="language-bash highlighter-rouge"><div class="highlight"><pre class="highlight"><code>xclock
</code></pre></div></div>

<p>If the window appears, X connectivity is confirmed.</p>

<h2 id="5-fix-locale-warnings-optional-but-clean">5. Fix locale warnings (optional but clean)</h2>

<p>If you see:</p>

<p>Warning: Missing charsets in String to FontSet conversion</p>

<p>Generate and enable a UTF-8 locale in WSL</p>

<div class="language-plaintext highlighter-rouge"><div class="highlight"><pre class="highlight"><code>sudo apt install locales
sudo locale-gen en_US.UTF-8
sudo update-locale LANG=en_US.utf8
</code></pre></div></div>

<p>Restart WSL, then verify:</p>

<div class="language-plaintext highlighter-rouge"><div class="highlight"><pre class="highlight"><code>locale
</code></pre></div></div>

<p>Ensure:</p>

<div class="language-plaintext highlighter-rouge"><div class="highlight"><pre class="highlight"><code>LANG=en_US.utf8 (or en_US.UTF-8)

LC_ALL is unset
</code></pre></div></div>

<p>If you want the simplest possible workaround instead:</p>

<p>LC_ALL=C xclock</p>

<h2 id="6-install-and-run-gtkwave-wsl-side">6. Install and run GTKWave (WSL side)</h2>

<div class="language-plaintext highlighter-rouge"><div class="highlight"><pre class="highlight"><code>sudo apt install gtkwave
gtkwave
</code></pre></div></div>

<p>GTKWave runs entirely in WSL; Cygwin only provides the display server.</p>

<h2 id="7-antivirus-note-important">7. Antivirus note (important)</h2>

<p>Some antivirus tools may flag:</p>

<pre><code class="language-DOS">C:\cygwin64\bin\dbus-launch.exe
</code></pre>

<p>This is a false positive (IDP.Generic / heuristic).
It is a normal Cygwin dbus helper.</p>

<p>Options:</p>

<p>Restore + whitelist C:\cygwin64\</p>

<p>Or leave it quarantined (GTKWave/XWin still works)</p>

<h2 id="8-example-output">8. Example output</h2>

<p>If successfully installed and configured, the results of <code class="language-plaintext highlighter-rouge">startxwin -- -listen tcp -ac</code> should looks something list this:</p>

<div class="language-text highlighter-rouge"><div class="highlight"><pre class="highlight"><code>gojimmypi@Notebook ~
$ startxwin -- -listen tcp -ac

Welcome to the XWin X Server
Vendor: The Cygwin/X Project
Release: 1.21.1.15
OS: CYGWIN_NT-10.0-26100 Notebook 3.6.5-1.x86_64 2025-10-09 17:21 UTC x86_64
OS: Windows 10  [Windows NT 10.0 build 26100] x64
Package: version 21.1.15-1 built 2025-01-26

XWin was started with the following command line:

/usr/bin/XWin :0 -multiwindow -listen tcp -ac -auth
 /home/gojimmypi/.serverauth.1580

(II) xorg.conf is not supported
(II) See http://x.cygwin.com/docs/faq/cygwin-x-faq.html for more information
winUpdateDpi - primary monitor native DPI x 120 y 120
LoadPreferences: /home/gojimmypi/.XWinrc not found
LoadPreferences: Loading /etc/X11/system.XWinrc
LoadPreferences: Done parsing the configuration file...
winDetectSupportedEngines - RemoteSession: no
winDetectSupportedEngines - DirectDraw4 installed, allowing ShadowDDNL
winDetectSupportedEngines - Returning, supported engines 00000005
winSetEngine - Multi Window or Rootless =&gt; ShadowGDI
winScreenInit - Using Windows display depth of 32 bits per pixel
winAllocateFBShadowGDI - Creating DIB with width: 4480 height: 1724 depth: 32
winFinishScreenInitFB - Masks: 00ff0000 0000ff00 000000ff
winInitVisualsShadowGDI - Masks 00ff0000 0000ff00 000000ff BPRGB 8 d 24 bpp 32
MIT-SHM extension disabled due to lack of kernel support
XFree86-Bigfont extension local-client optimization disabled due to lack of shared memory support in the kernel
glWinSelectGLimplementation: Loaded 'cygnativeGLthunk.dll'
(II) AIGLX: Testing pixelFormatIndex 1
GL_VERSION:     4.6.0 - Build 32.0.101.7077
GL_VENDOR:      Intel
GL_RENDERER:    Intel(R) Iris(R) Xe Graphics
(II) GLX: enabled GLX_SGI_make_current_read
(II) GLX: enabled GLX_SGI_swap_control
(II) GLX: enabled GLX_MESA_swap_control
(II) GLX: enabled GLX_SGIX_pbuffer
(II) GLX: enabled GLX_ARB_multisample
(II) GLX: enabled GLX_SGIS_multisample
(II) GLX: enabled GLX_ARB_fbconfig_float
(II) GLX: enabled GLX_EXT_fbconfig_packed_float
(II) GLX: enabled GLX_ARB_create_context
(II) GLX: enabled GLX_ARB_create_context_profile
(II) GLX: enabled GLX_ARB_create_context_robustness
(II) GLX: enabled GLX_EXT_create_context_es2_profile
(II) GLX: enabled GLX_ARB_framebuffer_sRGB
(II) AIGLX: enabled GLX_MESA_copy_sub_buffer
(II) 111 pixel formats reported by wglGetPixelFormatAttribivARB
(II) 74 fbConfigs
(II) ignored pixel formats: 1 not OpenGL, 0 unknown pixel type, 36 unaccelerated
(II) GLX: Initialized Win32 native WGL GL provider for screen 0
winPointerWarpCursor - Discarding first warp: 2240 862
(--) 5 mouse buttons found
(--) Setting autorepeat to delay=500, rate=31
(--) Windows keyboard layout: "00000409" (00000409) "US", type 4
(--) Found matching XKB configuration "English (USA)"
(--) Model = "pc105" Layout = "us" Variant = "none" Options = "none"
Rules = "base" Model = "pc105" Layout = "us" Variant = "none" Options = "none"
winInitMultiWindowWM - DISPLAY=:0.0
winMultiWindowXMsgProc - DISPLAY=:0.0
winMultiWindowXMsgProc - xcb_connect() returned and successfully opened the display.
winProcEstablishConnection - winInitClipboard returned.
winClipboardThreadProc - DISPLAY=:0.0
winInitMultiWindowWM - xcb_connect () returned and successfully opened the display.
winClipboardProc - xcb_connect () returned and successfully opened the display.
Using Composite redirection
OS has icon alpha channel support: yes
</code></pre></div></div>]]></content><author><name>gojimmypi</name></author><category term="WSL" /><category term="WSL1" /><category term="X-Windows" /><category term="XWin" /><category term="CygwinX" /><category term="xorg-server" /><category term="xauth" /><category term="xinit" /><category term="xterm" /><summary type="html"><![CDATA[Notes on installing an X-Windows Cygwin/X (XWin) server for WSL1]]></summary></entry><entry><title type="html">z8086 on ULX3S FPGA</title><link href="https://gojimmypi.github.io/z8086-on-ULX3S-FPGA/" rel="alternate" type="text/html" title="z8086 on ULX3S FPGA" /><published>2025-12-20T00:00:00+00:00</published><updated>2025-12-20T00:00:00+00:00</updated><id>https://gojimmypi.github.io/z8086-on-ULX3S-FPGA</id><content type="html" xml:base="https://gojimmypi.github.io/z8086-on-ULX3S-FPGA/"><![CDATA[<p>Update WSL to ensure either (1) WSL1 with X-Server or (2) WSL2 with WSLg is available. From an admin prompt:</p>

<div class="language-plaintext highlighter-rouge"><div class="highlight"><pre class="highlight"><code>C:\Users\gojimmypi&gt;wsl --update
Checking for updates.
Updating Windows Subsystem for Linux to version: 2.6.3.
</code></pre></div></div>

<p>See the prior blog <a href="https://gojimmypi.github.io/wsl-gui-using-cygwin-x-server-for/">WSL GUI - Using Cygwin X-Server for Graphical Interface</a>
as well as the updated <a href="../Cygwin-with-X-Support-WSL1/">Setup Cygwin Xwin X-Windows server for WSL1</a></p>

<p>The versions encountered in Windows/DOS:</p>

<div class="language-text highlighter-rouge"><div class="highlight"><pre class="highlight"><code>C:\Users\gojimmypi&gt;wsl --version
WSL version: 2.6.3.0
Kernel version: 6.6.87.2-1
WSLg version: 1.0.71
MSRDC version: 1.2.6353
Direct3D version: 1.611.1-81528511
DXCore version: 10.0.26100.1-240331-1435.ge-release
Windows version: 10.0.26100.7462
</code></pre></div></div>

<p>Version in WSL:</p>

<div class="language-plaintext highlighter-rouge"><div class="highlight"><pre class="highlight"><code>sudo apt update
# sudo apt install verilator # See below
sudo apt install -y help2man
</code></pre></div></div>

<p>A newer version of <a href="https://www.veripool.org/verilator/">Verilator</a> is needed than the one from <code class="language-plaintext highlighter-rouge">apt install verilator</code></p>

<div class="language-bash highlighter-rouge"><div class="highlight"><pre class="highlight"><code><span class="nb">cd</span> ~/workspace
<span class="c"># or</span>
<span class="nb">cd</span> /mnt/c/workspace

git clone https://github.com/verilator/verilator
<span class="nb">cd </span>verilator
git checkout stable
autoconf
./configure
make <span class="nt">-j</span><span class="s2">"</span><span class="si">$(</span><span class="nb">nproc</span><span class="si">)</span><span class="s2">"</span>

<span class="c"># If verilator was installed with apt</span>
<span class="nb">sudo </span>apt-get remove verilator
<span class="nb">hash</span> <span class="nt">-r</span>

<span class="c"># Will fail on WSL:</span>
<span class="c"># make test</span>

<span class="nb">sudo </span>make <span class="nb">install</span>

<span class="c"># Verify:</span>
which verilator
verilator <span class="nt">--version</span>
</code></pre></div></div>

<h2 id="z8086">z8086</h2>

<div class="language-plaintext highlighter-rouge"><div class="highlight"><pre class="highlight"><code>cd ~/workspace
# or
cd /mnt/c/workspace

git clone https://github.com/nand2mario/z8086.git
# or your fork
git clone https://github.com/$USER/z8086.git  z8086-$USER

cd z8086-$USER
</code></pre></div></div>

<p>Run tests</p>

<div class="language-plaintext highlighter-rouge"><div class="highlight"><pre class="highlight"><code># from /mnt/c/workspace/z8086-gojimmypi

cd tests
make -s build

wget https://github.com/nand2mario/z8086/releases/download/v0.1/8088.tar.gz
tar xzf 8088.tar.gz

make sim
</code></pre></div></div>

<p>The output should be something like:</p>

<div class="language-plaintext highlighter-rouge"><div class="highlight"><pre class="highlight"><code>./obj_dir/Vtb_z8086
[TB] stop_after_first=1
TB RESP ad=ffff0 bytes=34 b8 din=34b8
</code></pre></div></div>

<p>More importantly, there should be a new file:  <code class="language-plaintext highlighter-rouge">wave.fst</code></p>

<div class="language-plaintext highlighter-rouge"><div class="highlight"><pre class="highlight"><code>ls wave.fst
gtkwave wave.fst
</code></pre></div></div>

<p>CMake 3.25 or better needed. WSL1 is currently CMake 3.22.1. To update in /usr/local</p>

<div class="language-plaintext highlighter-rouge"><div class="highlight"><pre class="highlight"><code>cd /tmp
wget https://github.com/Kitware/CMake/releases/download/v3.29.6/cmake-3.29.6-linux-x86_64.sh
chmod +x cmake-3.29.6-linux-x86_64.sh
sudo ./cmake-3.29.6-linux-x86_64.sh --skip-license --prefix=/usr/local
</code></pre></div></div>

<p>The <code class="language-plaintext highlighter-rouge">boost</code> headers are needed.</p>

<div class="language-plaintext highlighter-rouge"><div class="highlight"><pre class="highlight"><code>sudo apt update
sudo apt install -y libboost-all-dev
</code></pre></div></div>

<p>Installed Cygwin.</p>

<div class="language-plaintext highlighter-rouge"><div class="highlight"><pre class="highlight"><code>yosys -p "read_verilog -sv -DULX3S \
    boards/ULX3S/top_ulx3s.sv \
    boards/ULX3S/vram_ecp5.sv \
    boards/ULX3S/pll_black_box.sv \
    boards/ULX3S/pll27.sv \
    boards/ULX3S/pll74.sv \
    boards/ULX3S/ecp5_io_blackbox.sv \
    boards/ULX3S/obufds_blackbox.sv \
    src/z8086/alu.sv \
    src/z8086/z8086.sv \
    src/soc_hdmi/z8086hdmi.sv \
    src/soc_hdmi/z8086soc.sv \
    src/soc_hdmi/uart_simple.sv \
    src/soc_hdmi/spram.sv \
    src/soc_hdmi/sprom.sv \
    src/soc_hdmi/hdmi/hdmi.sv \
    src/soc_hdmi/hdmi/tmds_channel.sv \
    src/soc_hdmi/hdmi/serializer.sv \
    src/soc_hdmi/hdmi/packet_assembler.sv \
    src/soc_hdmi/hdmi/packet_picker.sv \
    src/soc_hdmi/hdmi/audio_sample_packet.sv \
    src/soc_hdmi/hdmi/audio_info_frame.sv \
    src/soc_hdmi/hdmi/audio_clock_regeneration_packet.sv \
    src/soc_hdmi/hdmi/auxiliary_video_information_info_frame.sv \
    src/soc_hdmi/hdmi/source_product_description_info_frame.sv ; \
    synth_ecp5 -top top_ulx3s -json build/top.json"

nextpnr-ecp5 --package CABGA381 --json build/top.json --lpf boards/ULX3S/ulx3s_v20.lpf --textcfg top.config --85k
ecppack top.config top.bit
</code></pre></div></div>

<h2 id="fujprog">fujprog</h2>

<div class="language-plaintext highlighter-rouge"><div class="highlight"><pre class="highlight"><code>sudo apt-get update
sudo apt-get install -y pkg-config libftdi1-dev libusb-1.0-0-dev
sudo apt-get install -y libftdi1-dev libusb-dev cmake make build-essential

cd /mnt/c/workspace/

git clone https://github.com/gojimmypi/fujprog.git fujprog-gojimmypi


cd fujprog-gojimmypi
git checkout Visual-Studio-Build

mkdir build
cd build
cmake ..
make
sudo make install

</code></pre></div></div>

<div class="language-plaintext highlighter-rouge"><div class="highlight"><pre class="highlight"><code>$ ./fujprog-v48-win64.exe  "c:\workspace\z8086-gojimmypi\top.bit"
ULX2S / ULX3S JTAG programmer v4.8 (git 96ebb45 built Oct  7 2020 22:42:00)
Copyright (C) Marko Zec, EMARD, gojimmypi, kost and contributors
Using USB cable: ULX3S FPGA 12K v3.0.3

Found LFE5U-85F device, but the bitstream is for LFE5U-45F.

Failed.
</code></pre></div></div>

<p>Make sure the <code class="language-plaintext highlighter-rouge">--85k</code> was passed to <code class="language-plaintext highlighter-rouge">nextpnr-ecp5</code>:</p>

<div class="language-plaintext highlighter-rouge"><div class="highlight"><pre class="highlight"><code>nextpnr-ecp5 --package CABGA381 --json build/top.json --lpf boards/ULX3S/ulx3s_v20.lpf --textcfg top.config --85k
</code></pre></div></div>]]></content><author><name>gojimmypi</name></author><category term="z8086" /><category term="ULX3S" /><category term="FPGA" /><summary type="html"><![CDATA[Some notes on z8086 on ULX3S FPGA]]></summary></entry><entry><title type="html">EdgeRouter-X Port Mirroring: Inspect ESP32 Network Packets V2</title><link href="https://gojimmypi.github.io/Edgerouter-Port-Monitor-V2/" rel="alternate" type="text/html" title="EdgeRouter-X Port Mirroring: Inspect ESP32 Network Packets V2" /><published>2025-07-18T00:00:00+00:00</published><updated>2025-07-18T00:00:00+00:00</updated><id>https://gojimmypi.github.io/Edgerouter-Port-Monitor-V2</id><content type="html" xml:base="https://gojimmypi.github.io/Edgerouter-Port-Monitor-V2/"><![CDATA[<p>This setup is similar to a prior blog, but this time using an <a href="https://www.expressvpn.com/blog/aircove-go-new-portable-vpn-router/">ExpressVPN Go Router</a>.</p>

<p>The AirCove Go is cool for a variety of reasons, not only as a VPN for hotel guests, but also for the same feature that it is both a WiFi Station <code class="language-plaintext highlighter-rouge">STA</code> and Access Point <code class="language-plaintext highlighter-rouge">AP</code>.</p>

<p>Here, it is being used to connect an entire wired-LAN lab setup to a WiFi HotSpot for Internet.</p>

<div class="code-header">
    <button class="copy-code-button" aria-label="Copy code to clipboard" title="Copy this code segment to clipboard"></button>
</div>

<div class="language-bash highlighter-rouge"><div class="highlight"><pre class="highlight"><code>/sbin/switch mirror monitor <span class="o">[</span>portnumber]        - <span class="nb">enable </span>port mirror and indicate monitor port number
/sbin/switch mirror target <span class="o">[</span>portnumber] <span class="o">[</span>mode]  - <span class="nb">set </span>port mirror target<span class="p">;</span> 0:off, 1:rx, 2:tx, 3:all
</code></pre></div></div>
<p>cat &lt; /dev/serial0 &amp;
echo “test loopback” &gt; /dev/serial0</p>

<p>This time the configuration is using these ports on the EdgeRouter-X:</p>

<p><code class="language-plaintext highlighter-rouge">eth0</code> - Uplink to AriCove Go
<code class="language-plaintext highlighter-rouge">eth1</code> - Monitoring computer
<code class="language-plaintext highlighter-rouge">eth2</code> - Another computer
<code class="language-plaintext highlighter-rouge">eth3</code> - (available)
<code class="language-plaintext highlighter-rouge">eth4</code> - DUT Router</p>

<div class="code-header">
    <button class="copy-code-button" aria-label="Copy code to clipboard" title="Copy this code segment to clipboard"></button>
</div>

<div class="language-bash highlighter-rouge"><div class="highlight"><pre class="highlight"><code><span class="c"># we'll monitor from eth1. (ports start at 0, left-most when facing)</span>
<span class="nb">sudo</span> /sbin/switch mirror monitor 1

<span class="c"># start mirroring packets from eth4 onto eth1; a value of 3 means all packets</span>
<span class="nb">sudo</span> /sbin/switch mirror target 4 3
</code></pre></div></div>

<p>A list of all <code class="language-plaintext highlighter-rouge">switch</code> command-line parameters:</p>
<div class="code-header">
    <button class="copy-code-button" aria-label="Copy code to clipboard" title="Copy this code segment to clipboard"></button>
</div>

<div class="language-text highlighter-rouge"><div class="highlight"><pre class="highlight"><code>admin@EdgeRouter-X-5-Port# /sbin/switch
Usage:
 /sbin/switch acl etype add [ethtype] [portmap]              - drop etherytype packets
 /sbin/switch acl dip add [dip] [portmap]                    - drop dip packets
 /sbin/switch acl dip meter [dip] [portmap][meter:kbps]      - rate limit dip packets
 /sbin/switch acl dip trtcm [dip] [portmap][CIR:kbps][CBS][PIR][PBS] - TrTCM dip packets
 /sbin/switch acl port add [sport] [portmap]           - drop src port packets
 /sbin/switch acl L4 add [2byes] [portmap]             - drop L4 packets with 2bytes payload
 /sbin/switch add [mac] [portmap]                  - add an entry to switch table
 /sbin/switch add [mac] [portmap] [vlan id]        - add an entry to switch table
 /sbin/switch add [mac] [portmap] [vlan id] [age]  - add an entry to switch table
 /sbin/switch clear                                - clear switch table
 /sbin/switch del mac [mac] vid [vid]              - delete an entry from switch table
 /sbin/switch del mac [mac] fid [fid]            - delete an entry from switch table
 /sbin/switch search mac [mac] vid [vid]                 - search an entry with specific mac and vid
 /sbin/switch search mac [mac] fid [fid]                 - search an entry with specific mac and fid
 /sbin/switch dip add [dip] [portmap]                  - add a dip entry to switch table
 /sbin/switch dip del [dip]                          - del a dip entry to switch table
 /sbin/switch dip dump                                 - dump switch dip table
 /sbin/switch dip clear                                - clear switch dip table
 /sbin/switch dump              - dump switch table
 /sbin/switch ingress-rate on [port] [Kbps]        - set ingress rate limit on port 0~4
 /sbin/switch egress-rate on [port] [Kbps]         - set egress rate limit on port 0~4
 /sbin/switch ingress-rate off [port]              - del ingress rate limit on port 0~4
 /sbin/switch egress-rate off [port]               - del egress rate limit on port 0~4
 /sbin/switch filt [mac]                           - add a SA filtering entry (with portmap 1111111) to switch table
 /sbin/switch filt [mac] [portmap]                 - add a SA filtering entry to switch table
 /sbin/switch filt [mac] [portmap] [vlan id]       - add a SA filtering entry to switch table
 /sbin/switch filt [mac] [portmap] [vlan id] [age] - add a SA filtering entry to switch table
 /sbin/switch igmpsnoop on [Query Interval] [default router portmap] - turn on IGMP snoop and  router port learning (Query Interval 1~255)
 /sbin/switch igmpsnoop off                                  - turn off IGMP snoop and router port learning
 /sbin/switch igmpsnoop enable [port#]                       - enable IGMP HW leave/join/Squery/Gquery
 /sbin/switch igmpsnoop disable [port#]                      - disable IGMP HW leave/join/Squery/Gquery
 /sbin/switch mymac [mac] [portmap]                  - add a mymac entry to switch table
 /sbin/switch mirror monitor [portnumber]            - enable port mirror and indicate monitor port number
 /sbin/switch mirror target [portnumber] [0:off, 1:rx, 2:tx, 3:all]  - set port mirror target
 /sbin/switch phy                                        - dump all phy registers
 /sbin/switch phy [phy_addr]                     - dump phy register of specific port
 /sbin/switch phy mt7530                         - dump mt7530 phy registers
 /sbin/switch crossover [port] [auto/mdi/mdix]   - switch auto or force mdi/mdix mode for crossover cable
 /sbin/switch pvid [port] [pvid]                - set pvid on port 0~4
 /sbin/switch pvid dump                         - dump port pvid setting
 /sbin/switch reg r [offset]                       - register read from offset
 /sbin/switch reg w [offset] [value]               - register write value to offset
 /sbin/switch reg d [offset]                       - register dump
 /sbin/switch sip add [sip] [dip] [portmap]            - add a sip entry to switch table
 /sbin/switch sip del [sip] [dip]                            - del a sip entry to switch table
 /sbin/switch sip dump                                 - dump switch sip table
 /sbin/switch sip clear                                - clear switch sip table
 /sbin/switch tag on [port]                        - keep vlan tag for egress packet on prot 0~4
 /sbin/switch tag off [port]                       - remove vlan tag for egress packet on port 0~4
 /sbin/switch vlan dump                            - dump switch table
 /sbin/switch vlan set [vlan idx (NULL)][vid] [portmap]  - set vlan id and associated member
</code></pre></div></div>]]></content><author><name>gojimmypi</name></author><category term="WireShark" /><category term="port monitor" /><category term="port mirror" /><category term="port span" /><category term="switch" /><category term="ESP32" /><summary type="html"><![CDATA[This setup is similar to a prior blog, but this time using an ExpressVPN Go Router]]></summary></entry><entry><title type="html">EdgeRouter-X Factory Reset Flash and Setup New Bridge</title><link href="https://gojimmypi.github.io/EdgeRouterX-Flash-Factor-Reset-Bridge/" rel="alternate" type="text/html" title="EdgeRouter-X Factory Reset Flash and Setup New Bridge" /><published>2025-07-16T00:00:00+00:00</published><updated>2025-07-16T00:00:00+00:00</updated><id>https://gojimmypi.github.io/EdgeRouterX-Flash-Factor-Reset-Bridge</id><content type="html" xml:base="https://gojimmypi.github.io/EdgeRouterX-Flash-Factor-Reset-Bridge/"><![CDATA[<p>This blog details the steps needed to reflash an EdgeRouterX and upgrade <a href="https://www.ui.com/download/software/er-x">firmware</a>.</p>

<p>The <code class="language-plaintext highlighter-rouge">scp</code> copy method was needed after the existing firmware was found to be corrupted and did not accept web upload nor <a href="https://pjo2.github.io/tftpd64/">TFTP</a>.</p>

<p>There are two different EdgeRouter-X device models, nearly identical ER-X and the ERX-SFP. The SFP has a fiber port.</p>

<div class="code-header">
    <button class="copy-code-button" aria-label="Copy code to clipboard" title="Copy this code segment to clipboard"></button>
</div>

<div class="language-bash highlighter-rouge"><div class="highlight"><pre class="highlight"><code><span class="nb">cat</span> /tmp/device_model
</code></pre></div></div>

<p>Remove all ethernet cables from the EdgeRouter-X, otherwise some config commands may fail.</p>

<div style="margin-bottom:1em">
    Thanks to&nbsp;<a href="https://youtu.be/t3ZEFBHx-ZI">Willie Howe's Ubiquiti EdgeRouter X Hidden Console Port</a>&nbsp;video, I was able to easily find and connect a serial port to the internal UART connector of the EdgeRouter-X:
</div>

<div class="separator" style="clear: both; text-align: left;">
    <a href="../images/s1199/EdgeRouter_UART.jpg" style="margin-left: 1em; margin-right: 1em;">
        <img border="0" data-original-height="1199" data-original-width="743" height="400" src="../images/w248-h400/EdgeRouter_UART.jpg" width="248" />
    </a>
</div>
<p></p>

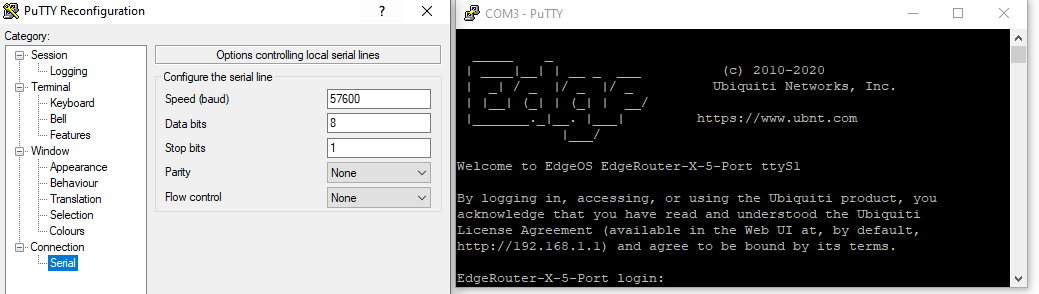
<p>
    Connect via putty to the serial port. 57600, 8N1:
</p>

<div class="separator" style="clear: both; text-align: left;">
    <a href="../images/s1039/EdgeOS_Putty.png" style="margin-left: 1em; margin-right: 1em;">
        <img border="0" data-original-height="294" data-original-width="1039" src="../images/s320/EdgeOS_Putty.PNG" width="320" alt="putty image" />
    </a>
</div>
<p><br /></p>

<p>Factory reset via <a href="https://help.uisp.com/hc/en-us/articles/22591216117015-EdgeRouter-Reset-to-Factory-Defaults">convoluted hardware method</a>
holding down the reset button for 10 seconds after port LEDs start lighting up in sequence and until the LED on port 1 lights up again…
or:</p>

<div class="code-header">
    <button class="copy-code-button" aria-label="Copy code to clipboard" title="Copy this code segment to clipboard"></button>
</div>

<div class="language-bash highlighter-rouge"><div class="highlight"><pre class="highlight"><code><span class="nb">sudo cp</span> /opt/vyatta/etc/config.boot.default /config/config.boot
reboot
</code></pre></div></div>

<p>Optionally re-flash using <code class="language-plaintext highlighter-rouge">scp</code> to copy and image to the device:</p>

<p>From another computer with <em>wired Ethernet</em>, make note of current config. Manually set the local IP address to <code class="language-plaintext highlighter-rouge">192.168.1.2</code>. Turn off WiFi if needed.</p>

<p>On Windows, this is in Control Panel: Network and Internet - Network Connections, right-click, properties, “Internet Protocol Version 5 (TCP/IPv4) Properties”.</p>

<p>The default gateway is <code class="language-plaintext highlighter-rouge">192.168.1.1</code> (The EdgeRouter-X), subnet mask <code class="language-plaintext highlighter-rouge">255.255.255.0</code>. No DNS needed during setup.</p>

<p>Plug the Ethernet from other computer into <code class="language-plaintext highlighter-rouge">eth0</code>. Yes, it <em>MUST</em> be <code class="language-plaintext highlighter-rouge">eth0</code> if factory reset.</p>

<p>The default IP address of the router after factor reset is <code class="language-plaintext highlighter-rouge">192.168.1.1</code> and should be accessed from <code class="language-plaintext highlighter-rouge">eth0</code>.</p>

<p>Use <code class="language-plaintext highlighter-rouge">scp</code> to copy the latest firmware to the EdgeRouter-X:</p>

<div class="code-header">
    <button class="copy-code-button" aria-label="Copy code to clipboard" title="Copy this code segment to clipboard"></button>
</div>

<div class="language-bash highlighter-rouge"><div class="highlight"><pre class="highlight"><code>scp ER-e50.v2.0.9-hotfix.7.5622731.tar  ubnt@192.168.1.1:/tmp/
</code></pre></div></div>

<p>The output should look something like this:</p>

<div class="code-header">
    <button class="copy-code-button" aria-label="Copy code to clipboard" title="Copy this code segment to clipboard"></button>
</div>

<div class="language-text highlighter-rouge"><div class="highlight"><pre class="highlight"><code>gojimmypi:~
$ cd /mnt/c/download/edgerouter

gojimmypi:/mnt/c/download/edgerouter
$ ls
ER-e50.v2.0.9-hotfix.7.5622731.tar

gojimmypi:/mnt/c/download/edgerouter
$ scp ER-e50.v2.0.9-hotfix.7.5622731.tar ubnt@192.168.1.1:/tmp/
The authenticity of host '192.168.1.1 (192.168.1.1)' can't be established.
ED25519 key fingerprint is SHA256:qJzhYqR0EkaLAeIBSJGkuAV81MzHS5BiRnYEjOKrZsY.
This key is not known by any other names
Are you sure you want to continue connecting (yes/no/[fingerprint])? y
Please type 'yes', 'no' or the fingerprint: yes
Warning: Permanently added '192.168.1.1' (ED25519) to the list of known hosts.
Welcome to EdgeOS

By logging in, accessing, or using the Ubiquiti product, you
acknowledge that you have read and understood the Ubiquiti
License Agreement (available in the Web UI at, by default,
http://192.168.1.1) and agree to be bound by its terms.

ubnt@192.168.1.1's password:
ER-e50.v2.0.9-hotfix.7.5622731.tar                                                    100%   70MB  10.4MB/s   00:06

gojimmypi:/mnt/c/download/edgerouter
</code></pre></div></div>

<p>From there, either <code class="language-plaintext highlighter-rouge">ssh ubnt@192.168.1.1</code> from the other computer, or connect via serial port.</p>

<p>It’s best to connect via serial port as some commands may fail when reconfiguring a live system.</p>

<p>If using serial port, now is a good time to restore network IP configuration on computer that was used to copy the firmware image.</p>

<p>Do not plug any Ethernet cables into the EdgeRouter during configuration.</p>

<p>The default username and password after factor reset is <code class="language-plaintext highlighter-rouge">ubnt</code>, <code class="language-plaintext highlighter-rouge">ubnt</code>.</p>

<p>Config the file is in <code class="language-plaintext highlighter-rouge">/tmp</code>:</p>

<div class="code-header">
    <button class="copy-code-button" aria-label="Copy code to clipboard" title="Copy this code segment to clipboard"></button>
</div>

<div class="language-plaintext highlighter-rouge"><div class="highlight"><pre class="highlight"><code>ubnt@EdgeRouter-X-5-Port:~$ ls /tmp
ER-e50.v2.0.9-hotfix.7.5622731.tar
device_model
ubnt.socket.cfgd
ubnt.socket.cli
ubnt.socket.ecstatsd
ubnt.socket.platd
ubnt.socket.statsd
ubnt.socket.sysd
ubnt@EdgeRouter-X-5-Port:~$
</code></pre></div></div>

<p>Add the new system image:</p>

<div class="code-header">
    <button class="copy-code-button" aria-label="Copy code to clipboard" title="Copy this code segment to clipboard"></button>
</div>

<div class="language-plaintext highlighter-rouge"><div class="highlight"><pre class="highlight"><code>add system image /tmp/ER-e50.v2.0.9-hotfix.7.5622731.tar
</code></pre></div></div>

<p>Output should look like this:</p>

<div class="code-header">
    <button class="copy-code-button" aria-label="Copy code to clipboard" title="Copy this code segment to clipboard"></button>
</div>

<div class="language-plaintext highlighter-rouge"><div class="highlight"><pre class="highlight"><code>ubnt@EdgeRouter-X-5-Port:~$ add system image ER-e50.v2.0.9-hotfix.7.5622731.tar
Version [v2.0.8-hotfix.1.5278088.200305.1641] is about to be replaced
Are you sure you want to replace old version? (Yes/No) [Yes]: Yes
Cannot find upgrade image. Upgrade failed.
.tar@EdgeRouter-X-5-Port:~$ add system image /tmp/ER-e50.v2.0.9-hotfix.7.5622731
Version [v2.0.8-hotfix.1.5278088.200305.1641] is about to be replaced
Are you sure you want to replace old version? (Yes/No) [Yes]: Yes
Checking upgrade image...Done
Preparing to upgrade...Done
Clearing directory /var/cache/apt (1.1M)...Done
Copying upgrade image...Not enough disk space for root file system
Do you want to delete old version first? (Yes/No) [Yes]:
Removing old image...Done
Warning duplicate image name, changing to [v2.0.9-hotfix.7.5622731.230615.0857-1]
Done
Checking upgrade image...Done
Copying config data...Done
Finishing upgrade...Done
Upgrade completed
</code></pre></div></div>

<p>For completeness, reboot and set to factory defaults a second time:</p>

<div class="code-header">
    <button class="copy-code-button" aria-label="Copy code to clipboard" title="Copy this code segment to clipboard"></button>
</div>

<div class="language-plaintext highlighter-rouge"><div class="highlight"><pre class="highlight"><code>reboot
</code></pre></div></div>

<p>Factory reset:</p>

<div class="code-header">
    <button class="copy-code-button" aria-label="Copy code to clipboard" title="Copy this code segment to clipboard"></button>
</div>

<div class="language-bash highlighter-rouge"><div class="highlight"><pre class="highlight"><code><span class="nb">sudo cp</span> /opt/vyatta/etc/config.boot.default /config/config.boot
reboot
</code></pre></div></div>

<p>Enter configuration mode:</p>

<div class="code-header">
    <button class="copy-code-button" aria-label="Copy code to clipboard" title="Copy this code segment to clipboard"></button>
</div>

<div class="language-bash highlighter-rouge"><div class="highlight"><pre class="highlight"><code>configure
</code></pre></div></div>

<p>Ensure all ethernet cables are removed from the EdgeRouter-X!</p>

<p>Enter new configuration, first delete <code class="language-plaintext highlighter-rouge">eth0</code> and <code class="language-plaintext highlighter-rouge">eth1</code> that are part of factor reset.</p>

<div class="code-header">
    <button class="copy-code-button" aria-label="Copy code to clipboard" title="Copy this code segment to clipboard"></button>
</div>

<div class="language-plaintext highlighter-rouge"><div class="highlight"><pre class="highlight"><code>delete interfaces ethernet eth0 address
commit

delete interfaces ethernet eth1 address
commit

set interfaces bridge br0 address 192.168.142.203/24

set interfaces ethernet eth0 bridge-group bridge br0
set interfaces ethernet eth1 bridge-group bridge br0
set interfaces ethernet eth2 bridge-group bridge br0

set service gui listen-address 192.168.142.203

commit
save
exit
</code></pre></div></div>

<p>Reboot from bash prompt.</p>

<div class="code-header">
    <button class="copy-code-button" aria-label="Copy code to clipboard" title="Copy this code segment to clipboard"></button>
</div>

<div class="language-bash highlighter-rouge"><div class="highlight"><pre class="highlight"><code>reboot
</code></pre></div></div>

<p>The final Vyatta-format <code class="language-plaintext highlighter-rouge">boot.config</code> file looks like this with the <code class="language-plaintext highlighter-rouge">show configuration</code> command:</p>

<div class="code-header">
    <button class="copy-code-button" aria-label="Copy code to clipboard" title="Copy this code segment to clipboard"></button>
</div>

<div class="language-bash highlighter-rouge"><div class="highlight"><pre class="highlight"><code>interfaces <span class="o">{</span>
    bridge br0 <span class="o">{</span>
        address 192.168.142.203/24
    <span class="o">}</span>
    ethernet eth0 <span class="o">{</span>
        bridge-group <span class="o">{</span>
            bridge br0
        <span class="o">}</span>
        duplex auto
        speed auto
    <span class="o">}</span>
    ethernet eth1 <span class="o">{</span>
        bridge-group <span class="o">{</span>
            bridge br0
        <span class="o">}</span>
        duplex auto
        speed auto
    <span class="o">}</span>
    ethernet eth2 <span class="o">{</span>
        duplex auto
        speed auto
    <span class="o">}</span>
    ethernet eth3 <span class="o">{</span>
        duplex auto
        speed auto
    <span class="o">}</span>
    ethernet eth4 <span class="o">{</span>
        duplex auto
        poe <span class="o">{</span>
            output off
        <span class="o">}</span>
        speed auto
    <span class="o">}</span>
    loopback lo <span class="o">{</span>
    <span class="o">}</span>
    switch switch0 <span class="o">{</span>
        mtu 1500
    <span class="o">}</span>
<span class="o">}</span>
service <span class="o">{</span>
    gui <span class="o">{</span>
        http-port 80
        https-port 443
        listen-address 192.168.142.203
        older-ciphers <span class="nb">enable</span>
    <span class="o">}</span>
    ssh <span class="o">{</span>
        port 22
        protocol-version v2
    <span class="o">}</span>
    unms <span class="o">{</span>
    <span class="o">}</span>
<span class="o">}</span>
system <span class="o">{</span>
    analytics-handler <span class="o">{</span>
        send-analytics-report <span class="nb">false</span>
    <span class="o">}</span>
    crash-handler <span class="o">{</span>
        send-crash-report <span class="nb">false</span>
    <span class="o">}</span>
    host-name EdgeRouter-X-5-Port
    login <span class="o">{</span>
        user YOURLOGIN <span class="o">{</span>
            authentication <span class="o">{</span>
                encrypted-password <span class="k">****************</span>
                plaintext-password <span class="k">****************</span>
            <span class="o">}</span>
            level admin
        <span class="o">}</span>
    <span class="o">}</span>
    ntp <span class="o">{</span>
        server 0.ubnt.pool.ntp.org <span class="o">{</span>
        <span class="o">}</span>
        server 1.ubnt.pool.ntp.org <span class="o">{</span>
        <span class="o">}</span>
        server 2.ubnt.pool.ntp.org <span class="o">{</span>
        <span class="o">}</span>
        server 3.ubnt.pool.ntp.org <span class="o">{</span>
        <span class="o">}</span>
    <span class="o">}</span>
    syslog <span class="o">{</span>
        global <span class="o">{</span>
            facility all <span class="o">{</span>
                level notice
            <span class="o">}</span>
            facility protocols <span class="o">{</span>
                level debug
            <span class="o">}</span>
        <span class="o">}</span>
    <span class="o">}</span>
    time-zone UTC
<span class="o">}</span>
</code></pre></div></div>

<p>The bad blocks should be reported during boot, but not during Linux initialization:</p>

<div class="code-header">
    <button class="copy-code-button" aria-label="Copy code to clipboard" title="Copy this code segment to clipboard"></button>
</div>

<div class="language-plaintext highlighter-rouge"><div class="highlight"><pre class="highlight"><code>[NAND]select ecc bit:4, sparesize :64 spare_per_sector=16
nand: device found, Manufacturer ID: 0xc2, Chip ID: 0xda
nand: Macronix NAND 256MiB 3,3V 8-bit
nand: 256 MiB, SLC, erase size: 128 KiB, page size: 2048, OOB size: 64
Scanning device for bad blocks
Bad eraseblock 97 at 0x000000c20000
Bad eraseblock 1479 at 0x00000b8e0000
Bad eraseblock 1966 at 0x00000f5c0000
Bad eraseblock 2001 at 0x00000fa20000
8 fixed-partitions partitions found on MTD device MT7621-NAND
Creating 8 MTD partitions on "MT7621-NAND":
0x000000000000-0x000010000000 : "ALL"
0x000000000000-0x000000080000 : "Bootloader"
0x000000080000-0x0000000e0000 : "Config"
0x0000000e0000-0x000000140000 : "eeprom"
0x000000140000-0x000000440000 : "Kernel1"
0x000000440000-0x000000740000 : "Kernel2"
0x000000740000-0x00000ff00000 : "RootFS"
</code></pre></div></div>

<p>See prior related blogs:</p>

<ul>
  <li><a href="../Espressif-ESP32-WiFi-Port-Sniffing-DUT/">Espressif ESP32 WiFi Port Sniffing</a></li>
  <li><a href="../Edgerouter-Port-Monitor/">EdgeRouter-X Port Mirroring: Inspect ESP32 Network Packets</a></li>
  <li><a href="../dual-wan-openvpn-with-edgerouter-x-or/">Dual WAN OpenVPN with EdgeRouter X or RT-AX86U</a></li>
</ul>

<p>Other links of interest:</p>

<ul>
  <li><a href="https://pjo2.github.io/tftpd64/">Tftpd64</a></li>
  <li><a href="https://www.ui.com/download/software/er-x">EdgeRouter X, ER-X Firmware</a></li>
  <li><a href="https://dl.ubnt.com/guides/edgemax/EdgeRouter_ER-X_QSG.pdf">EdgeRouter X Getting Started</a></li>
  <li><a href="https://dl.ubnt.com/guides/edgemax/EdgeOS_UG.pdf">EdgeRouter X User Guide</a></li>
  <li><a href="https://dl.ubnt.com/datasheets/edgemax/EdgeRouter_X_DS.pdf">EdgeRouter X Data Sheet</a></li>
</ul>

<p>Certificate-related links</p>

<ul>
  <li><a href="https://support.globalsign.com/ca-certificates/root-certificates/globalsign-root-certificates">GlobalSign Root Certificates</a></li>
  <li><a href="https://letsencrypt.org/certs/isrgrootx1.pem.txt">LetsEncrypt isrgrootx1 PEM</a></li>
</ul>

<p>Special links:</p>

<ul>
  <li><a href="https://expressvpnrouter.com/ui/dashboard">ExpressVpnRouter</a> (must have local ExpressVPN router)</li>
</ul>]]></content><author><name>gojimmypi</name></author><category term="EdgeRouter" /><category term="Ubiquiti" /><category term="Bridge" /><category term="Factory Reset" /><category term="Networking" /><category term="UART" /><category term="TTY" /><category term="SSH" /><summary type="html"><![CDATA[This blog details the steps needed to reflash an EdgeRouterX and upgrade firmware]]></summary></entry><entry><title type="html">WSL missing USB mapping</title><link href="https://gojimmypi.github.io/WSL-missing-usb-mapping/" rel="alternate" type="text/html" title="WSL missing USB mapping" /><published>2025-04-30T00:00:00+00:00</published><updated>2025-04-30T00:00:00+00:00</updated><id>https://gojimmypi.github.io/WSL-missing-usb-mapping</id><content type="html" xml:base="https://gojimmypi.github.io/WSL-missing-usb-mapping/"><![CDATA[<div class="language-plaintext highlighter-rouge"><div class="highlight"><pre class="highlight"><code>$ readlink -f /mnt/f
/mnt/f
</code></pre></div></div>

<p>but <code class="language-plaintext highlighter-rouge">ls /mnt/f</code> does not show the files in the root of the USB <code class="language-plaintext highlighter-rouge">F:\</code> drive.</p>

<div class="language-plaintext highlighter-rouge"><div class="highlight"><pre class="highlight"><code>sudo mkdir -p /mnt/usb
sudo mount -t drvfs F: /mnt/usb
ls /mnt/usb
</code></pre></div></div>

<p>Backup <code class="language-plaintext highlighter-rouge">C:\Sysgcc</code></p>

<div class="language-plaintext highlighter-rouge"><div class="highlight"><pre class="highlight"><code>sudo rsync -a --exclude='*.tmp' /mnt/c/SysGCC/ /mnt/usb/Backup2/SysGCC/
</code></pre></div></div>]]></content><author><name>gojimmypi</name></author><category term="WSL" /><category term="USB" /><summary type="html"><![CDATA[``` $ readlink -f /mnt/f /mnt/f ``` but `ls /mnt/f` does not show the files in the root of the USB `F:\` drive. ``` sudo mkdir -p /mnt/usb]]></summary></entry></feed>